
| C# listView ドラッグ&ドロップ |
先回 listView と imageList を使ってサムネイル画像表示・追加・挿入・削除などの基本機能を確認しました。今回は listView に表示した画像をマウスのドラッグ&ドロップ操作で位置を変更したり、コピーする処理について確認しました。
| listView ドラッグ&ドロップ操作 |
次の(1)~(4)の図で機能を説明します。
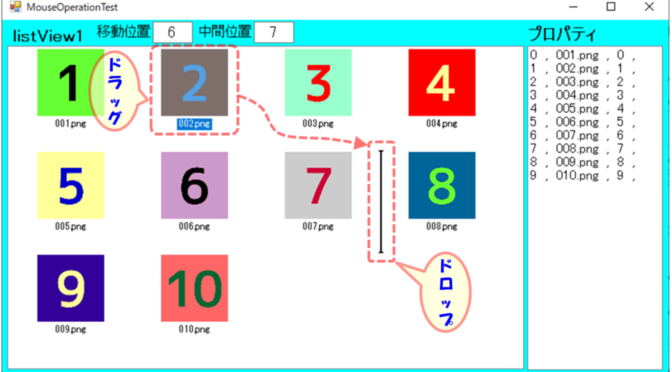
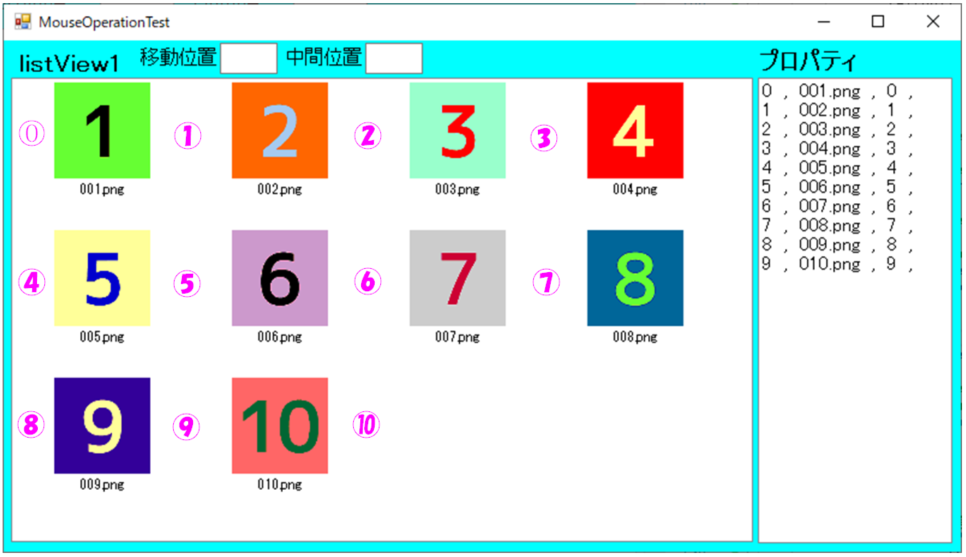
(1)起動直後の状態
指定フォルダーの画像を表示した起動直後の状態です。最上段部の「移動位置」は画像ドラッグ開始後、マウスがどの画像付近にあるかを表示します。下図の場合は、No[1]→“0”,No[2]→“1” と、番号から1を引いた値が「移動位置」になります。
中間位置は、No[1]~No[10]の画像の間に表示されている ⓪~⑩の番号位置です。(実際のプログラムでは表示されません。) 中間位置は移動位置の画像に対し、マウスが左側にある時は同じ値、右側にある時は1加算された値になります。
画像ドラッグ中はマウスカーソルの位置から、画像の移動位置、中間位置を繰り返し取得・更新します。
(2)ドラッグ&ドロップ操作
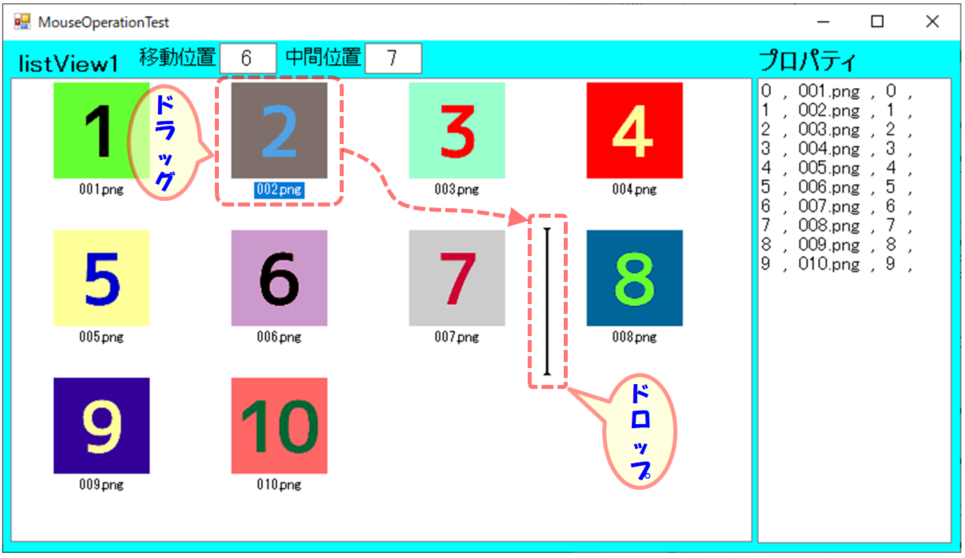
次の例では、No[2]の画像をドラッグ(マウス左ボタン押下)し、中間位置⑦でドロップ(ボタンを離す)します。ドラッグ中、中間位置に InsertionMark(挿入マーク)が表示され、挿入位置が視覚的に確認できる様になっています。
(3)処理結果
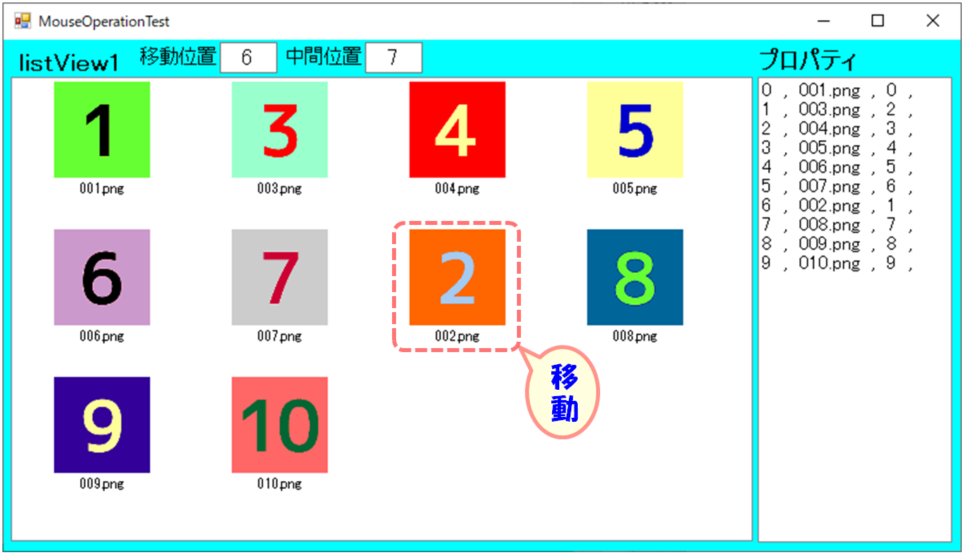
(a) 移動処理
下図の通り、No[2]画像は、中間位置⑦に移動します。元のNo[2]画像は無くなり、No[2]画像は移動後1つ前にずれます。
(b) コピー処理
コピーはドロップする時に「CTRL」ボタンを押すことで可能です。下図の通り、No[2]画像は、中間位置⑦にコピーされ、元のNo[2]画像も残った状態です。

| プログラム概要(SingleSelect対応) |
プログラムについて要点を下の表に整理します。
| 表:プログラムの行番号と内容 | ||
| 行 | 内 容 | |
| 31-36 | listViewのDrop処理許可 マウスドラッグ&ドロップのイベント追加 |
|
| 42 | マウスドラッグ時、ドラッグ&ドロップ処理開始 | |
| 60,64 | CTRL入力状態により、Copy,Moveを選択 →ドラッグ中にカーソル付近の表示が変化する |
|
| 68,71 | マウスカーソル位置に近い、listViewのインデックス番号を取得する | |
| 92,97, 103 |
マウスカーソルが対象画像の左側か右側かでInsertionMark(挿入マーク)表示位置修正・表示 | |
| 139 | InsertionMark(挿入マーク)同様に挿入位置を取得し、画像挿入 | |
| 144 | 移動処理時は移動元画像抹消 | |
プログラム内には、今回調査内容の中で今後自分で使う可能性がありそうなものもコメントアウトし残していますが、ご容赦下さい。
using System;
using System.Collections.Generic;
using System.ComponentModel;
using System.Data;
using System.Drawing;
using System.Linq;
using System.Text;
using System.Threading.Tasks;
using System.Windows.Forms;

using System.IO;

namespace ListViewTest
{
    public partial class Form2 : Form
    {
        public Form2()
        {
            InitializeComponent();
        }

        private void Form2_Load(object sender, EventArgs e)
        {
            listView1_init();
            get_pic_thumbnail();
            chk_listView1(0);
        }

        private void listView1_init() {
            listView1.LargeImageList = imageList1;
            listView1.AllowDrop = true ;

            listView1.ItemDrag += new ItemDragEventHandler(listView1_ItemDrag);
            listView1.DragEnter += new DragEventHandler(listView1_DragEnter);
            listView1.DragOver += new DragEventHandler(listView1_DragOver);
            listView1.DragDrop += new DragEventHandler(listView1_DragDrop);

        }

        // ①ドラッグ時1回発生するイベント
        private void listView1_ItemDrag(Object sender, ItemDragEventArgs e) {
            listView1.DoDragDrop((ListViewItem)e.Item, DragDropEffects.Copy | DragDropEffects.Move);
        }

        // ②ドラッグ開始(移動開始)直後1回発生するイベント
        private void listView1_DragEnter(object sender, System.Windows.Forms.DragEventArgs e)
        {
            // listView1_DragOverイベントにて処理
        }

        // ③アイテムドラッグ中に繰り返し発生するイベント
        // InsertionMark(挿入位置)を入れる
        private void listView1_DragOver(object sender, System.Windows.Forms.DragEventArgs e)
        {
            if (e.Data.GetDataPresent(typeof(ListViewItem)))
            {
                if ((e.KeyState & 0x1) > 0 && (e.KeyState & 0x8) > 0)
                {   // 0x1(1):マウス左,0x2(2):マウス右,0x4(4):Shift,0x8(8):CTRL,0x10(16):マウス中央,0x20(32):ALT
                    // マウス左+CTRL
                    e.Effect = DragDropEffects.Copy;
                }
                else
                {
                    e.Effect = DragDropEffects.Move;
                }

                // Retrieve the client coordinates of the mouse pointer.
                Point targetPoint = listView1.PointToClient(new Point(e.X, e.Y));

                // Retrieve the index of the item closest to the mouse pointer.
                int targetIndex = listView1.InsertionMark.NearestIndex(targetPoint);
                int ins_p_Index = targetIndex;                              // 中間位置

                // ★下記は確認・検証用(アイテムプロパティ取得の参考になるので残している)
                //ListViewItem srcItem = (ListViewItem)e.Data.GetData(typeof(ListViewItem));
                //ListViewItem tgtItem = this.listView1.GetItemAt(targetPoint.X, targetPoint.Y);
                //textBox3.Text = srcItem.Index.ToString() + " , " + srcItem.Text + " , " + srcItem.ImageIndex.ToString() + " , " + srcItem.ImageKey;
                //if (tgtItem != null)
                //{ textBox4.Text = tgtItem.Index.ToString() + " , " + tgtItem.Text + " , " + tgtItem.ImageIndex.ToString() + " , " + tgtItem.ImageKey; }
                //else{ textBox4.Text = ""; }


                // Confirm that the mouse pointer is not over the dragged item.
                // 最近アイテムが、現ドラッグ項目(自分自身)の場合は、-1 が返される。
                if (targetIndex > -1)
                {
                    // Determine whether the mouse pointer is to the left or the right of
                    // the midpoint of the closest item and set the InsertionMark.AppearsAfterItem property accordingly.
                    Rectangle itemBounds = listView1.GetItemRect(targetIndex);
                    if (targetPoint.X > itemBounds.Left + (itemBounds.Width / 2))
                    {
                        listView1.InsertionMark.AppearsAfterItem = true;    // 近いアイテム後方
                        ins_p_Index++;                                      // 中間位置
                    }
                    else
                    {
                        listView1.InsertionMark.AppearsAfterItem = false;   // 近いアイテム前方
                    }
                }

                // Set the location of the insertion mark. If the mouse is over the dragged item,
                // the targetIndex value is -1 and the insertion mark disappears.
                listView1.InsertionMark.Index = targetIndex;

                textBox1.Text = targetIndex.ToString();                     // 移動位置
                textBox2.Text = ins_p_Index.ToString();                     // 中間位置
            } else {
                textBox1.Text = "ERR : Not List View Item.";
            }
        }

        // ④ドロップ時1回発生するイベント
        private void listView1_DragDrop(object sender, System.Windows.Forms.DragEventArgs e)
        {
            if (e.Data.GetDataPresent(typeof(ListViewItem)))
            {
                // Retrieve the client coordinates of the mouse pointer.
                Point targetPoint = listView1.PointToClient(new Point(e.X, e.Y));

                // Retrieve the index of the item closest to the mouse pointer.
                // ListViewItem tgtItem = this.listView1.GetItemAt(targetPoint.X, targetPoint.Y);   // 図上ポイント時有効
                // int targetIndex = this.listView1.Items.IndexOf(tgtItem);                         // →図の隙間は無効
                int targetIndex = listView1.InsertionMark.NearestIndex(targetPoint);                // 近い位置
                int ins_p_Index = targetIndex;                                                      // 中間位置

                ListViewItem srcItem = (ListViewItem)e.Data.GetData(typeof(ListViewItem));

                if (targetIndex > -1)
                {
                    // Determine whether the mouse pointer is to the left or the right of
                    // the midpoint of the closest item and set the InsertionMark.AppearsAfterItem property accordingly.
                    Rectangle itemBounds = listView1.GetItemRect(targetIndex);
                    if (targetPoint.X > itemBounds.Left + (itemBounds.Width / 2))
                    {
                        ins_p_Index++;                                                              // 中間位置
                    }

                    // 確定位置に挿入
                    ListViewItem newItem = this.listView1.Items.Insert(ins_p_Index, srcItem.Text, srcItem.ImageIndex);
                    newItem.Selected = true;

                    // 移動時ソースアイテム削除
                    if ((e.KeyState & 0x8) <= 0){
                        this.listView1.Items.Remove(srcItem);
                    }

                    chk_listView1(1);                                                               // 再描画
                }
            }
        }


        // サムネイル画像取得・listView表示
        private void get_pic_thumbnail()
        {
            string imageDir = @""; // 画像ディレクトリ
            string[] jpgFiles = System.IO.Directory.GetFiles(imageDir, "*.PNG");

            int width = 80;
            int height = 80;

            imageList1.ImageSize = new Size(width, height);
            listView1.LargeImageList = imageList1;

            // imageList , listView 登録
            for (int i = 0; i < jpgFiles.Length; i++)
            {
                String F_Name = Path.GetFileName(jpgFiles[i]);
                Image original = Bitmap.FromFile(jpgFiles[i]);
                Image thumbnail = createThumbnail(original, width, height);

                imageList1.Images.Add(F_Name, thumbnail);
                //imageList1.Images.Add(thumbnail);
                listView1.Items.Add(F_Name, i);


                original.Dispose();
                thumbnail.Dispose();
            }
        }


        // 幅w、高さh サムネイル画像作成
        Image createThumbnail(Image image, int w, int h)
        {
            Bitmap canvas = new Bitmap(w, h);

            Graphics g = Graphics.FromImage(canvas);
            g.FillRectangle(new SolidBrush(Color.White), 0, 0, w, h);

            float fw = (float)w / (float)image.Width;
            float fh = (float)h / (float)image.Height;

            float scale = Math.Min(fw, fh);
            fw = image.Width * scale;
            fh = image.Height * scale;

            g.DrawImage(image, (w - fw) / 2, (h - fh) / 2, fw, fh);
            g.Dispose();

            return canvas;
        }


        // アイテムの関連プロパティ取得・再表示
        private void chk_listView1(int kbn)
        {
            listBox1.Items.Clear();
            // リストビュー1(listView1)プロパティ
            int listViewCnt1 = listView1.Items.Count;
            string[,] dat_vw1 = new string[listViewCnt1, 4];
            for (int i = 0; i < listViewCnt1; i++)
            {
                dat_vw1[i, 0] = listView1.Items[i].Index.ToString();
                dat_vw1[i, 1] = listView1.Items[i].Text;
                dat_vw1[i, 2] = listView1.Items[i].ImageIndex.ToString();
                dat_vw1[i, 3] = listView1.Items[i].ImageKey;

                listBox1.Items.Add(dat_vw1[i, 0] + "  ,  " + dat_vw1[i, 1] + "  ,  " + dat_vw1[i, 2] + "  ,  " + dat_vw1[i, 3]);
            }

            // listViewを一旦初期化し再表示する
            if (kbn == 1)
            {
                listView1.Clear();

                for (int i = 0; i < dat_vw1.GetLength(0); i++)
                {
                    listView1.Items.Add(dat_vw1[i, 1], int.Parse(dat_vw1[i, 2]));
                }
            }
        }

    }
}
| 複数選択 (MultiSelect) ・削除機能 |
これまで書いた機能に画像アイテムを複数選択し、移動・コピー・抹消する機能を追加しました。また、プログラム検証のため“再読込”も追加しています。
(1)複数選択
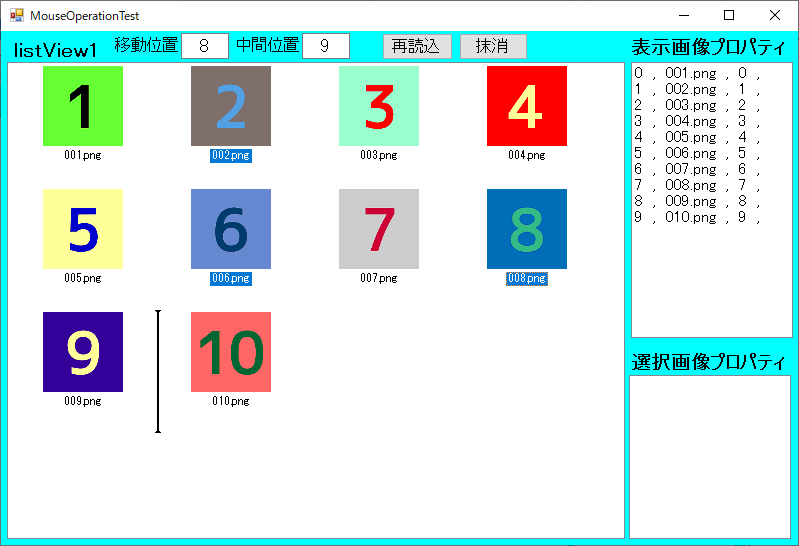
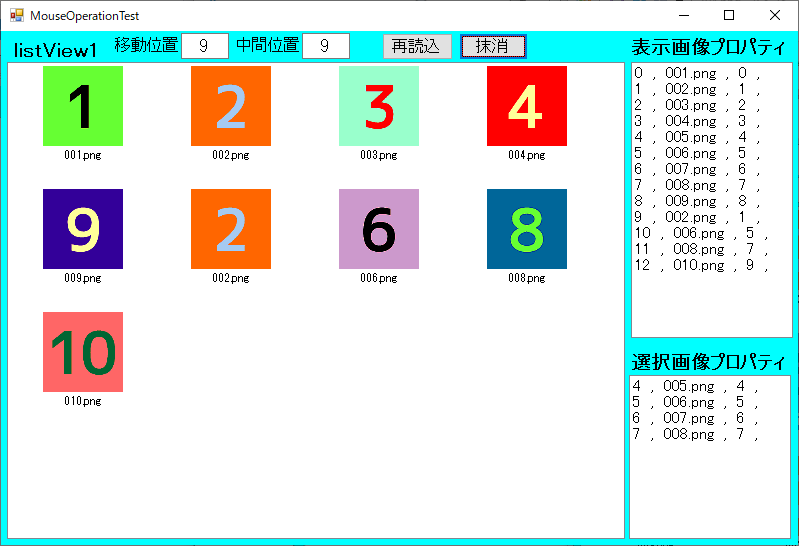
エクスプローラーと同様に、[SHIFT]キーを押しながら連続選択、[CTRL]キーを押しながら個別複数選択が出来ます。下図は、No〔2〕〔6〕〔8〕が選択され、テキスト部が反転表示されています。移動位置〔8〕(中間位置〔9〕)にInsertionMarkがあります。
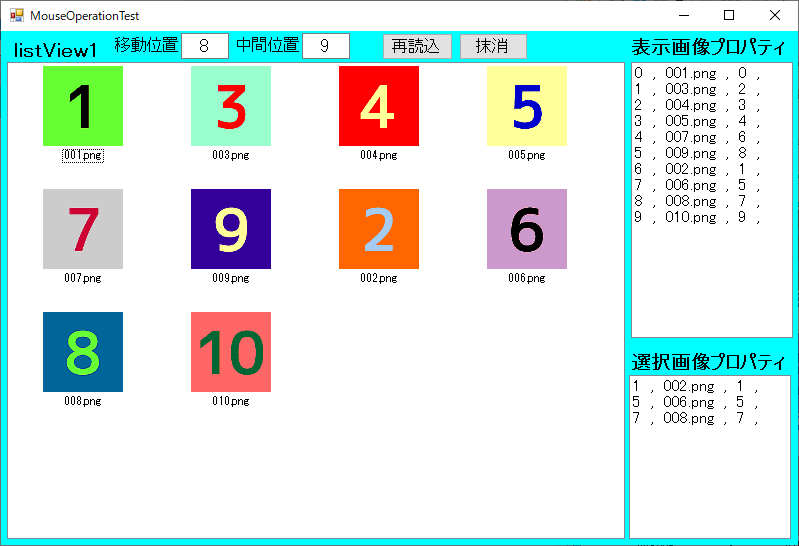
(2)移動・コピー結果
①移動の場合
No〔9〕〔10〕間に、No〔2〕〔6〕〔8〕を移動
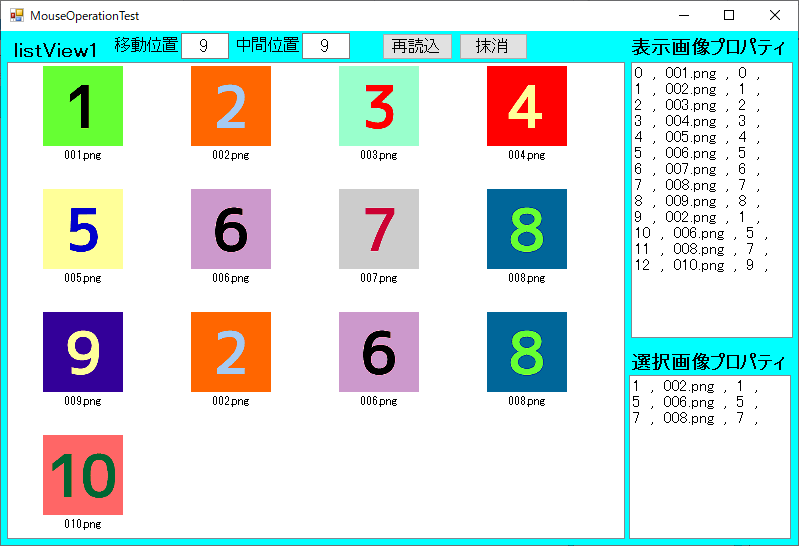
 ②コピーの場合
No〔9〕〔10〕間に、No〔2〕〔6〕〔8〕をコピー
(3)抹消処理
①画像選択
No〔5〕〔6〕〔7〕〔8〕を選択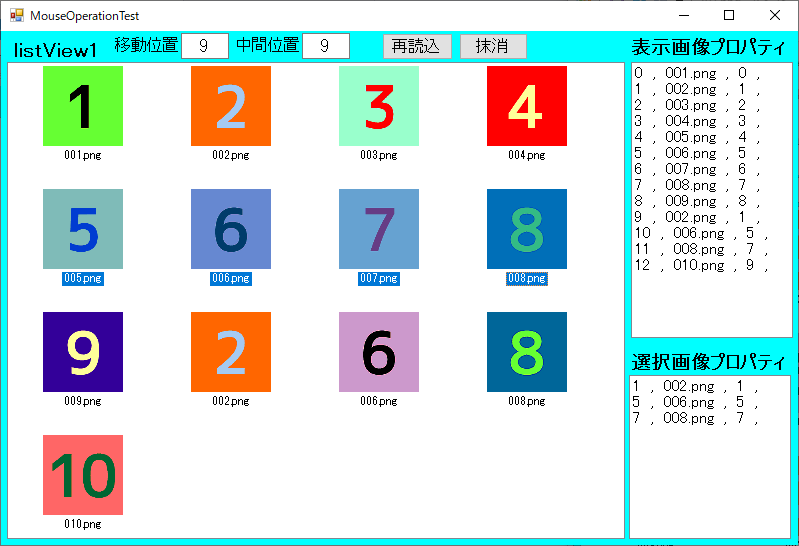 ②抹消
②抹消
“抹消”ボタンをクリック。
No〔5〕〔6〕〔7〕〔8〕は消去。
| プログラム概要 (MultiSelect対応) |
Single対応と基本は同じですが、選択されている画像数が、listViewの SelectedItems.Count で取得できるので、選択されている画像の回数分、Insert処理と移動の場合はRemove処理を繰り返す様に変更しました。
先ず行番35でMultiSelectプロパティをTrueにします。行番143~192で移動とコピー用の“Insert”、“Remove”処理を行っています。シングルの場合もマルチの場合と同じ処理で良いと思いますが、シングル対応は元の方法を残しています。行番289~316では同じ考え方を抹消処理に適用しています。
using System;
using System.Collections.Generic;
using System.ComponentModel;
using System.Data;
using System.Drawing;
using System.Linq;
using System.Text;
using System.Threading.Tasks;
using System.Windows.Forms;

using System.IO;

namespace ListViewTest
{
    public partial class Form2 : Form
    {
        public Form2()
        {
            InitializeComponent();
        }

        private void Form2_Load(object sender, EventArgs e)
        {
            listView1_init();
            get_pic_thumbnail();
            chk_listView1(0);
        }

        private void listView1_init() {
            listView1.Items.Clear();
            imageList1.Images.Clear();

            listView1.LargeImageList = imageList1;
            listView1.AllowDrop = true ;
            listView1.MultiSelect = true ;

            listView1.ItemDrag += new ItemDragEventHandler(listView1_ItemDrag);
            listView1.DragEnter += new DragEventHandler(listView1_DragEnter);
            listView1.DragOver += new DragEventHandler(listView1_DragOver);
            listView1.DragDrop += new DragEventHandler(listView1_DragDrop);

        }

        // ①ドラッグ時1回発生するイベント
        private void listView1_ItemDrag(Object sender, ItemDragEventArgs e) {
            listView1.DoDragDrop((ListViewItem)e.Item, DragDropEffects.Copy | DragDropEffects.Move);
        }

        // ②ドラッグ開始(移動開始)直後1回発生するイベント
        private void listView1_DragEnter(object sender, System.Windows.Forms.DragEventArgs e)
        {
            // listView1_DragOverイベントにて処理
        }

        // ③アイテムドラッグ中に繰り返し発生するイベント
        // InsertionMark(挿入位置)を入れる
        private void listView1_DragOver(object sender, System.Windows.Forms.DragEventArgs e)
        {
            if (e.Data.GetDataPresent(typeof(ListViewItem)))
            {
                if ((e.KeyState & 0x1) > 0 && (e.KeyState & 0x8) > 0)
                {   // 0x1(1):マウス左,0x2(2):マウス右,0x4(4):Shift,0x8(8):CTRL,0x10(16):マウス中央,0x20(32):ALT
                    // マウス左+CTRL
                    e.Effect = DragDropEffects.Copy;
                }
                else
                {
                    e.Effect = DragDropEffects.Move;
                }

                // Retrieve the client coordinates of the mouse pointer.
                Point targetPoint = listView1.PointToClient(new Point(e.X, e.Y));

                // Retrieve the index of the item closest to the mouse pointer.
                int targetIndex = listView1.InsertionMark.NearestIndex(targetPoint);
                int ins_p_Index = targetIndex;                              // 中間位置

                // ★下記は確認・検証用(アイテムプロパティ取得の参考になるので残している)
                //ListViewItem srcItem = (ListViewItem)e.Data.GetData(typeof(ListViewItem));
                //ListViewItem tgtItem = this.listView1.GetItemAt(targetPoint.X, targetPoint.Y);
                //textBox3.Text = srcItem.Index.ToString() + " , " + srcItem.Text + " , " + srcItem.ImageIndex.ToString() + " , " + srcItem.ImageKey;
                //if (tgtItem != null)
                //{ textBox4.Text = tgtItem.Index.ToString() + " , " + tgtItem.Text + " , " + tgtItem.ImageIndex.ToString() + " , " + tgtItem.ImageKey; }
                //else{ textBox4.Text = ""; }


                // Confirm that the mouse pointer is not over the dragged item.
                // 最近アイテムが、現ドラッグ項目(自分自身)の場合は、-1 が返される。
                if (targetIndex > -1)
                {
                    // Determine whether the mouse pointer is to the left or the right of
                    // the midpoint of the closest item and set the InsertionMark.AppearsAfterItem property accordingly.
                    Rectangle itemBounds = listView1.GetItemRect(targetIndex);
                    if (targetPoint.X > itemBounds.Left + (itemBounds.Width / 2))
                    {
                        listView1.InsertionMark.AppearsAfterItem = true;    // 近いアイテム後方
                        ins_p_Index++;                                      // 中間位置
                    }
                    else
                    {
                        listView1.InsertionMark.AppearsAfterItem = false;   // 近いアイテム前方
                    }
                }

                // Set the location of the insertion mark. If the mouse is over the dragged item,
                // the targetIndex value is -1 and the insertion mark disappears.
                listView1.InsertionMark.Index = targetIndex;

                textBox1.Text = targetIndex.ToString();                     // 移動位置
                textBox2.Text = ins_p_Index.ToString();                     // 中間位置
            } else {
                textBox1.Text = "ERR : Not List View Item.";
            }
        }

        // ④ドロップ時1回発生するイベント
        private void listView1_DragDrop(object sender, System.Windows.Forms.DragEventArgs e)
        {
            if (e.Data.GetDataPresent(typeof(ListViewItem)))
            {
                // Retrieve the client coordinates of the mouse pointer.
                Point targetPoint = listView1.PointToClient(new Point(e.X, e.Y));

                // Retrieve the index of the item closest to the mouse pointer.
                // ListViewItem tgtItem = this.listView1.GetItemAt(targetPoint.X, targetPoint.Y);   // 図上ポイント時有効
                // int targetIndex = this.listView1.Items.IndexOf(tgtItem);                         // →図の隙間は無効
                int targetIndex = listView1.InsertionMark.NearestIndex(targetPoint);                // 近い位置
                int ins_p_Index = targetIndex;                                                      // 中間位置

                ListViewItem srcItem = (ListViewItem)e.Data.GetData(typeof(ListViewItem));


                if (targetIndex > -1)
                {
                    // Determine whether the mouse pointer is to the left or the right of
                    // the midpoint of the closest item and set the InsertionMark.AppearsAfterItem property accordingly.
                    Rectangle itemBounds = listView1.GetItemRect(targetIndex);
                    if (targetPoint.X > itemBounds.Left + (itemBounds.Width / 2))
                    {
                        ins_p_Index++;                                                              // 中間位置
                    }

                    listBox2.Items.Clear();
                    int item_cnt = listView1.SelectedItems.Count;                                   // 選択画像数

                    if (item_cnt > 1) {
                        ListViewItem[] item_selected = new ListViewItem[listView1.SelectedItems.Count];

                        // 選択項目を一旦配列に格納
                        for (int i = 0; i < listView1.SelectedItems.Count; i++)
                        {
                            item_selected[i] = listView1.SelectedItems[i];
                            string[] dat_vw1 = new string[4];

                            dat_vw1[0] = item_selected[i].Index.ToString();
                            dat_vw1[1] = item_selected[i].Text;
                            dat_vw1[2] = item_selected[i].ImageIndex.ToString();
                            dat_vw1[3] = item_selected[i].ImageKey;

                            listBox2.Items.Add(dat_vw1[0] + "  ,  " + dat_vw1[1] + "  ,  " + dat_vw1[2] + "  ,  " + dat_vw1[3]);
                        }

                        // 配列に格納した選択項目を順番に追加
                        for (int i = 0; i < item_selected.Length; i++)
                        {
                            int exec_order = item_selected.Length - i - 1;          // 追加順番を逆転し挿入する

                            ListViewItem newItem = this.listView1.Items.Insert(ins_p_Index, item_selected[exec_order].Text, item_selected[exec_order].ImageIndex);
                            newItem.Selected = true;
                        }

                        // 移動(Move)時ソースアイテム削除
                        if ((e.KeyState & 0x8) <= 0)
                        {
                            for (int i = 0; i < item_selected.Length; i++)
                            {
                                this.listView1.Items.Remove(item_selected[i]);
                            }
                        }


                    } else {
                        // 確定位置に挿入
                        ListViewItem newItem = this.listView1.Items.Insert(ins_p_Index, srcItem.Text, srcItem.ImageIndex);
                        newItem.Selected = true;

                        // 移動時ソースアイテム削除
                        if ((e.KeyState & 0x8) <= 0)
                        {
                            this.listView1.Items.Remove(srcItem);
                        }
                    }

                    chk_listView1(1);                                                               // 再描画
                }
            }
        }


        // サムネイル画像取得・listView表示
        private void get_pic_thumbnail()
        {
            string imageDir = @""; // 画像ディレクトリ
            string[] jpgFiles = System.IO.Directory.GetFiles(imageDir, "*.PNG");

            int width = 80;
            int height = 80;

            imageList1.ImageSize = new Size(width, height);

            // imageList , listView 登録
            for (int i = 0; i < jpgFiles.Length; i++)
            {
                String F_Name = Path.GetFileName(jpgFiles[i]);
                Image original = Bitmap.FromFile(jpgFiles[i]);
                Image thumbnail = createThumbnail(original, width, height);

                imageList1.Images.Add(F_Name, thumbnail);
                //imageList1.Images.Add(thumbnail);
                listView1.Items.Add(F_Name, i);


                original.Dispose();
                thumbnail.Dispose();
            }
        }


        // 幅w、高さh サムネイル画像作成
        Image createThumbnail(Image image, int w, int h)
        {
            Bitmap canvas = new Bitmap(w, h);

            Graphics g = Graphics.FromImage(canvas);
            g.FillRectangle(new SolidBrush(Color.White), 0, 0, w, h);

            float fw = (float)w / (float)image.Width;
            float fh = (float)h / (float)image.Height;

            float scale = Math.Min(fw, fh);
            fw = image.Width * scale;
            fh = image.Height * scale;

            g.DrawImage(image, (w - fw) / 2, (h - fh) / 2, fw, fh);
            g.Dispose();

            return canvas;
        }


        // アイテムの関連プロパティ取得・再表示
        private void chk_listView1(int kbn)
        {
            listBox1.Items.Clear();
            // リストビュー1(listView1)プロパティ
            int listViewCnt1 = listView1.Items.Count;
            string[,] dat_vw1 = new string[listViewCnt1, 4];
            for (int i = 0; i < listViewCnt1; i++)
            {
                dat_vw1[i, 0] = listView1.Items[i].Index.ToString();
                dat_vw1[i, 1] = listView1.Items[i].Text;
                dat_vw1[i, 2] = listView1.Items[i].ImageIndex.ToString();
                dat_vw1[i, 3] = listView1.Items[i].ImageKey;

                listBox1.Items.Add(dat_vw1[i, 0] + "  ,  " + dat_vw1[i, 1] + "  ,  " + dat_vw1[i, 2] + "  ,  " + dat_vw1[i, 3]);
            }

            // listViewを一旦初期化し再表示する
            if (kbn == 1)
            {
                listView1.Clear();

                for (int i = 0; i < dat_vw1.GetLength(0); i++)
                {
                    listView1.Items.Add(dat_vw1[i, 1], int.Parse(dat_vw1[i, 2]));
                }
            }
        }

        // 再読込
        private void button2_Click(object sender, EventArgs e)
        {
            listView1.Items.Clear();
            imageList1.Images.Clear();
            get_pic_thumbnail();
            chk_listView1(0);
        }

        // 抹消処理(複数処理可能)
        private void button1_Click(object sender, EventArgs e)
        {
            listBox2.Items.Clear();
            if (listView1.SelectedItems.Count==0) { return; }       // 選択項目がない場合、処理終了

            ListViewItem[] item_selected = new ListViewItem[listView1.SelectedItems.Count];

            // 選択項目を一旦配列に格納
            for (int i = 0; i < listView1.SelectedItems.Count; i++)
            {
                item_selected[i] = listView1.SelectedItems[i];
                string[] dat_vw1 = new string[4];

                dat_vw1[0] = item_selected[i].Index.ToString();
                dat_vw1[1] = item_selected[i].Text;
                dat_vw1[2] = item_selected[i].ImageIndex.ToString();
                dat_vw1[3] = item_selected[i].ImageKey;

                listBox2.Items.Add(dat_vw1[0] + "  ,  " + dat_vw1[1] + "  ,  " + dat_vw1[2] + "  ,  " + dat_vw1[3]);
            }

            // 配列に格納した選択項目を順番に抹消
            for (int i = 0; i < item_selected.Length ; i++)
            {
                listView1.Items.Remove(item_selected[i]);
            }
        }


    }
}
| 参考サイト |
①ListViewInsertionMark.NearestIndex(Point) メソッド
②Windows フォーム ListView コントロールに挿入マーク表示
③DragEventArgs.KeyState プロパティ