
概要
7セグ LED解析に CANNY法というエッジ検出アルゴリズムを使ってみました。
これまでの投稿で利用している赤色のLEDは二値化処理により文字部と周辺部を安定して分離出来ました。 一方、コントラストが低い黄色のLEDも準備していて、文字部と周辺部を分離するには、二値化の閾値を小さくする必要がありました。結果、照明による反射等の影響を受け、うまく処理出来ませんでした。
OpenCVのCANNY法を試したところ、安定したエッジ検出が出来たので、 CANNY法を使った 7セグLED解析を検討しました。
※素人の趣味ですので、不適切な表現等は御容赦お願いします。
結果
室内照明の点灯/消灯に関係なく比較的安定的に7セグLED解析が出来ています。
消灯時でも窓から自然光は入るので、薄暗い状態です。“比較的”と書いたのは、特に 室内照明点灯時にノイズの様なエッジ成分を検出し 、誤判定することがあります。今回は試していませんが、例えば、検出したエッジ数によってCanny処理の閾値を変えたり、連続解析する中で突発的に発生する誤判定結果を除去することで精度を向上させる余地はあると考えています。
(1)室内照明消灯(昼間)
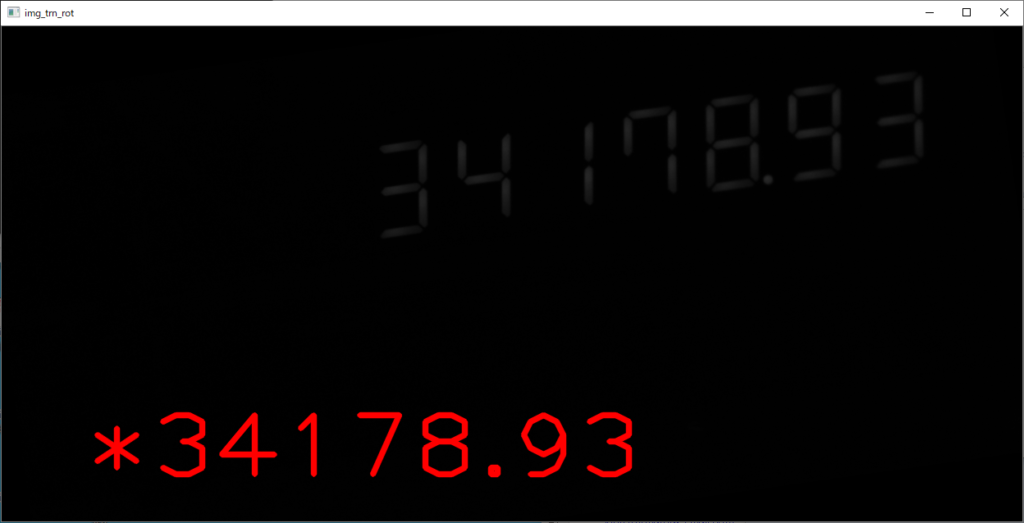
①ライブ画像に解析結果表示
消灯時は全体に暗く、文字部もぼやけています。
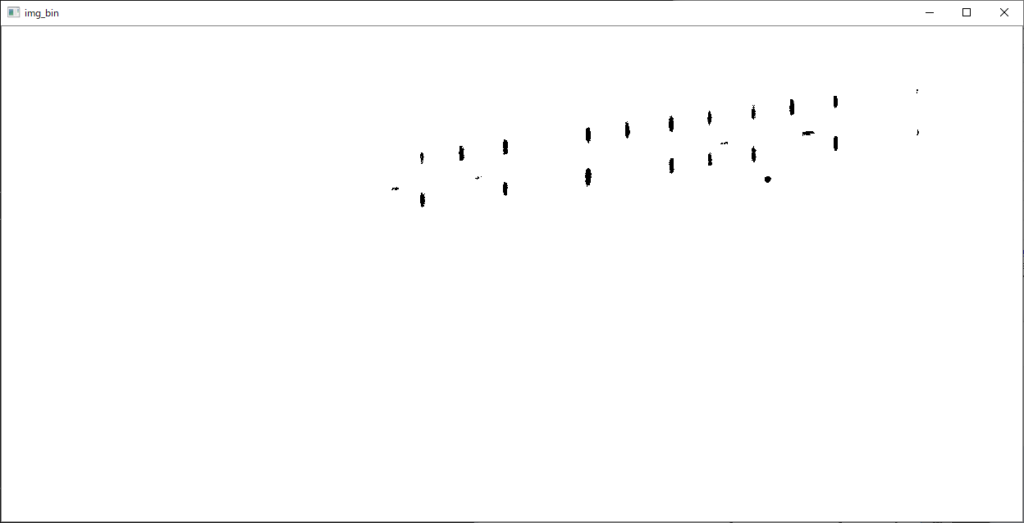
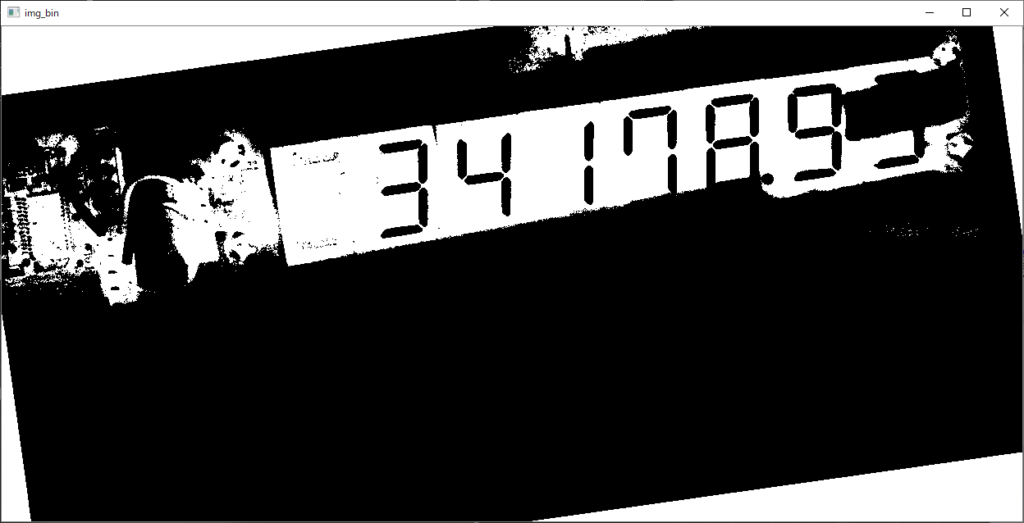
②二値化処理
2値化処理しても文字部を確実に切り分け出来ません。
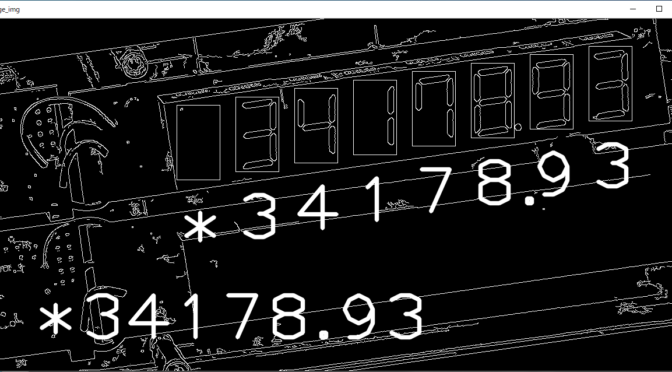
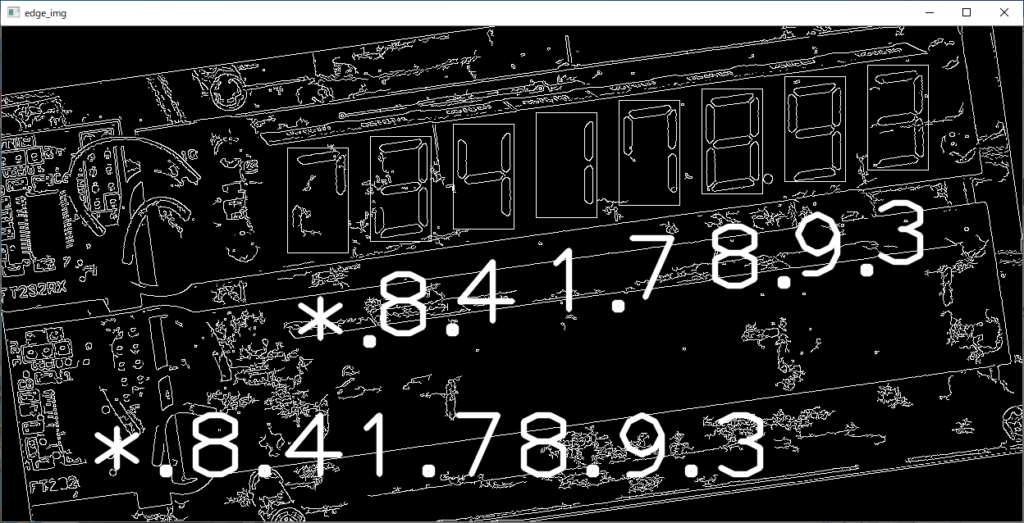
③Canny処理によるLED解析と結果表示
Canny処理で文字部エッジを取得します。
明確な輪郭を取得することが出来ました。
※文字部の矩形枠は解析領域を示す為、描画したものです。

(2)室内照明点灯時(昼間)
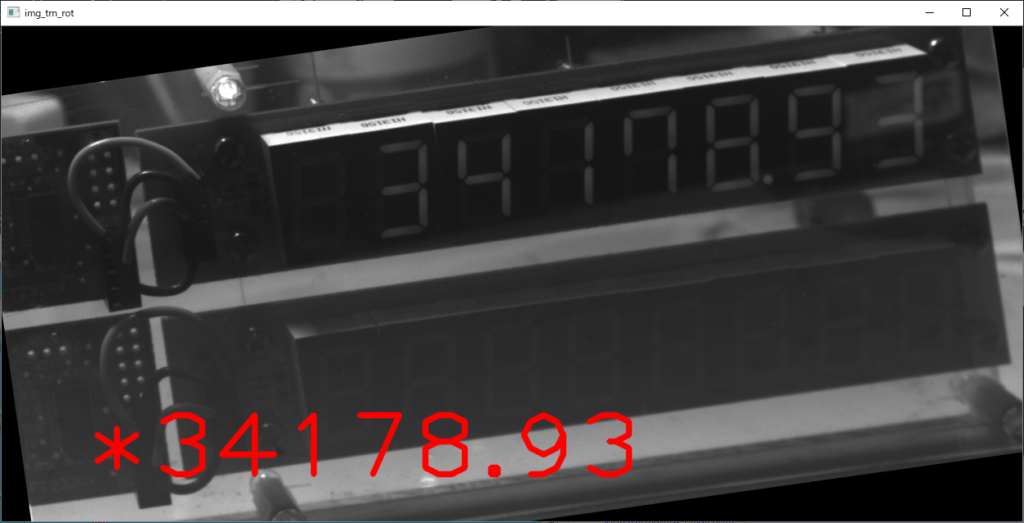
①ライブ画像に解析結果表示
照明を点灯すると周辺の配線等も確認出来ます。
②二値化処理
二値化処理すると文字部は明確になりましたが、閾値を小さく設定しているので、光の反射等の影響を受けやすく、文字部に影(黒い部分)が重なってしまいます。
③Canny処理によるLED解析 と結果表示
Canny処理で文字部エッジを取得します。
LED外形形状や配線等のエッジも取得していますが、文字部と重なっていないので、問題はありませんでした。
※文字部の矩形枠は解析領域を示す為、描画したものです。

(3)誤判定例
次の画像は、卓上蛍光灯を表示器近くで照射することで、文字部領域にノイズを発生させ誤判定させたものです。もともと7セグLEDの場合、点灯しなくても発光部周辺に境界線があるので、明るくしすぎると輪郭として検出することがあります。また、それとは別に光の反射等を検出してしまうこともある様です。
数字判定ロジック
取得した輪郭画像の8ヶ所ある文字部(セグメント)の中の各LED毎に点灯状態を画像判定します。
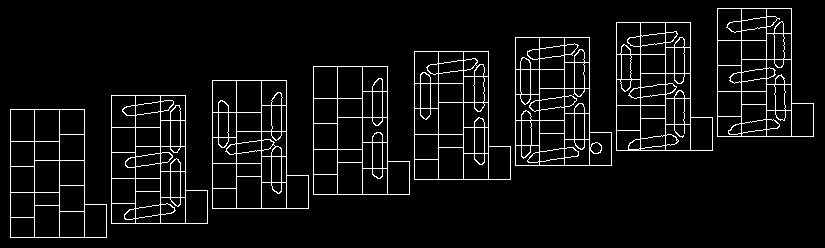
具体的には次の図の通り各セグメント画像の中の8つの領域のそれぞれに対し、白色部分の面積を計算します。基本的に消灯の場合は0、点灯の場合は50くらいなので、中間の25を閾値として判定しています。
例えば、1~7のLED が全て点灯の場合、“8” が表示されていいると判定します。
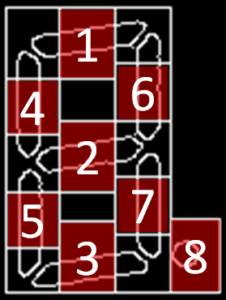
Canny処理後、輪郭内部を充填しテンプレートマッチングすることや特徴点を抽出し判定する方法も少し検討しましたが、難しそうな為、とりあえず、この方式で対応しています。
プログラム
プログラムです。
from pypylon import pylon
import numpy as np
import cv2
import serial
import time
import random


def DISP_7SEG_1CHR( disp_str ):
    ser = serial.Serial("COM6",9600)
    for i in range(8):
        ser.write(bytes( disp_str , "UTF-8" ))
    ser.write(b"\r")
    time.sleep(0.1)
    ser.close

def DISP_7SEG_RANDAM():
    disp_chr = ""
    dot_pos=random.randint(4, 6)
    emp_pos=random.randint(0, 3)

    ser = serial.Serial("COM6", 9600)
    for i in range(8):
        tmp = random.randint(0, 9)

        if i >= emp_pos:
            disp_chr = disp_chr + str(tmp)

            if i == dot_pos:
                disp_chr = disp_chr + '.'
        else:
            disp_chr = disp_chr + ' '

    ser.write(bytes(disp_chr,"UTF-8"))

    ser.write(b"\r")
    time.sleep(0.3)
    ser.close

    return disp_chr

def DISP_IMAGE(img_name,img_disp,kbn):
    if(kbn==0):
        cv2.namedWindow(img_name, cv2.WINDOW_NORMAL)
    else:
        cv2.namedWindow(img_name, cv2.WINDOW_AUTOSIZE)

    cv2.imshow(img_name , img_disp)


def chk_crop_image(img_crp , px , py , px_w ,py_h ):

    chk_seg = ["0","0","0","0","0","0","0","0"]

    chk_seg[0] = cv2.countNonZero(img_crp[0:int(5*py_h/20),int(px_w/3):int(2*px_w/3)])                  #中央 上部
    chk_seg[1] = cv2.countNonZero(img_crp[int(8*py_h/20):int(13*py_h/20),int(px_w/3):int(2*px_w/3)])    #中央 中部
    chk_seg[2] = cv2.countNonZero(img_crp[int(15*py_h/20):py_h,int(px_w/3):int(2*px_w/3)])              #中央 下部

    chk_seg[3] = cv2.countNonZero(img_crp[int(5*py_h/20) :int(9*py_h/20),0:int(px_w/3)])                #左 上部
    chk_seg[4] = cv2.countNonZero(img_crp[int(13*py_h/20) :int(17*py_h/20),0:int(px_w/3)])              #左 下部
    chk_seg[5] = cv2.countNonZero(img_crp[int(4*py_h/20) :int(8*py_h/20),int(2*px_w/3):px_w])           #右 上部
    chk_seg[6] = cv2.countNonZero(img_crp[int(12*py_h/20) :int(16*py_h/20),int(2*px_w/3):px_w])         #右 下部

    chk_seg[7] = cv2.countNonZero(edge_img[ py+py_h-33 : py+py_h , px+px_w : px+px_w+23])               #小数点

    tmp_str=""
    for i in range(7):
        if(chk_seg[i]>35):
            tmp_str=tmp_str+"1"
        else:
            tmp_str=tmp_str+"0"


    if(tmp_str=="1011111"):
        tmp="0"
    elif(tmp_str=="1111011"):
        tmp="9"
    elif(tmp_str=="1111111"):
        tmp="8"
    elif(tmp_str=="1001011"):
        tmp="7"
    elif(tmp_str=="1111101"):
        tmp="6"
    elif(tmp_str=="1111001"):
        tmp="5"
    elif(tmp_str=="0101011"):
        tmp="4"
    elif(tmp_str=="1110011"):
        tmp="3"
    elif(tmp_str=="1110110"):
        tmp="2"
    elif(tmp_str=="0000011"):
        tmp="1"
    else:
        tmp="*"

    if(chk_seg[7] > 25):
        tmp=tmp+"."


    # 横方向
    #cv2.rectangle(edge_img, (px + int(px_w/3) , py ), (px + int(2*px_w/3) , py + int(5*py_h/20)),(255, 255, 255), thickness=1)
    #cv2.rectangle(edge_img, (px + int(px_w/3) , py + int(8*py_h/20)), (px + int(2*px_w/3) , py + int(13*py_h/20)),(255, 255, 255), thickness=1)
    #cv2.rectangle(edge_img, (px + int(px_w/3) , py + int(15*py_h/20)), (px + int(2*px_w/3) , py + py_h),(255, 255, 255), thickness=1)

    # 縦方向
    #cv2.rectangle(edge_img, (px , py + int(5*py_h/20) ), (px + int(px_w/3) , py + int(9*py_h/20)),(255, 255, 255), thickness=1)
    #cv2.rectangle(edge_img, (px , py + int(13*py_h/20) ), (px + int(px_w/3) , py + int(17*py_h/20)),(255, 255, 255), thickness=1)
    #cv2.rectangle(edge_img, (px + int(2*px_w/3) , py + int(4*py_h/20) ), (px + px_w , py + int(8*py_h/20)),(255, 255, 255), thickness=1)
    #cv2.rectangle(edge_img, (px + int(2*px_w/3) , py + int(12*py_h/20) ), (px + px_w , py + int(16*py_h/20)),(255, 255, 255), thickness=1)

    # 小数点
    #cv2.rectangle(edge_img, (px + px_w , py + py_h - 33 ), (px + px_w + 22 , py + py_h ),(255, 255, 255), thickness=1)

    cv2.putText(edge_img, tmp , (px, py + py_h + 120), cv2.FONT_HERSHEY_PLAIN, 8, (255, 255, 255), 5, cv2.LINE_AA)
    cv2.rectangle(edge_img, (px , py ), (px + px_w , py + py_h ),(255, 255, 255), thickness=1)

    return tmp


# マウスイベント時に処理を行う
def mouse_event(event, x, y, flags, param):

    # 左クリックに反応
    if event == cv2.EVENT_LBUTTONUP:
        tmp_pos = str(x)+','+str(y)

        hgt = img_cpy.shape[0]      # 高さ取得
        wdt = img_cpy.shape[1]      # 幅取得

        if(x < int(wdt/2)):
            if(y < int(hgt/2)):
                global clk_p_UL
                clk_p_UL = tmp_pos
            else:
                global clk_p_DL
                clk_p_DL = tmp_pos
        else:
            if(y < int(hgt/2)):
                global clk_p_UR
                clk_p_UR = tmp_pos
            else:
                global clk_p_DR
                clk_p_DR = tmp_pos


# conecting to the first available camera
camera = pylon.InstantCamera(pylon.TlFactory.GetInstance().CreateFirstDevice())

# Grabing Continusely (video) with minimal delay
camera.StartGrabbing(pylon.GrabStrategy_LatestImageOnly)
converter = pylon.ImageFormatConverter()

# converting to opencv bgr format
converter.OutputPixelFormat = pylon.PixelType_BGR8packed
converter.OutputBitAlignment = pylon.OutputBitAlignment_MsbAligned

# 変数設定
# H:75.5 W:155.5
dst_w = 1244                # 変換幅
dst_h = 604                 # 変換高

P_LU=[210,450]              # [左上] 射影変換
P_RU=[2300,450]             # [右上] 射影変換
P_LD=[218,1470]             # [左下]  射影変換
P_RD=[2195,1388]            # [右下]  射影変換

SEG_X=1055                  # X : SEG-LOCATION-X
SEG_Y=47                    # Y : SEG-LOCATION-Y
SEG_W=74                    # W : SEG-WIDTH
SEG_H=128                   # H : SEG-HEIGHT
S_S_X=101                   # SEG_SPAN_X
S_S_Y=14.5                  # SEG_SPAN_Y

s_mgn_y=0                   # マージン
s_mgn_x=0                   # マージン


# DISP_7SEG_1CHR("8.")      # 7SEG表示 12.7x19mm
dsp_str = DISP_7SEG_RANDAM()


# マウスイベント処理用
clk_p_UL = ""
clk_p_DL = ""
clk_p_UR = ""
clk_p_DR = ""
loop_cnt = 0

while camera.IsGrabbing():

    grabResult = camera.RetrieveResult(5000, pylon.TimeoutHandling_ThrowException)

    if grabResult.GrabSucceeded():
        # Access the image data
        image = converter.Convert(grabResult)
        img = image.GetArray()
        img_cpy = img.copy()

        cv2.putText(img_cpy, "W"+str(img_cpy.shape[1])+" H"+str(img_cpy.shape[0]), ((int)(img_cpy.shape[1]/2)-200, 60), cv2.FONT_HERSHEY_PLAIN, 4, (255, 255, 255), 5, cv2.LINE_AA)
        cv2.putText(img_cpy, clk_p_UL , (10, 60), cv2.FONT_HERSHEY_PLAIN, 4, (255, 255, 255), 5, cv2.LINE_AA)
        cv2.putText(img_cpy, clk_p_DL , (10, img_cpy.shape[0]-30), cv2.FONT_HERSHEY_PLAIN, 4, (255, 255, 255), 5, cv2.LINE_AA)
        cv2.putText(img_cpy, clk_p_UR , (img_cpy.shape[1]-400, 60), cv2.FONT_HERSHEY_PLAIN, 4, (255, 255, 255), 5, cv2.LINE_AA)
        cv2.putText(img_cpy, clk_p_DR , (img_cpy.shape[1]-400, img_cpy.shape[0]-30), cv2.FONT_HERSHEY_PLAIN, 4, (255, 255, 255), 5, cv2.LINE_AA)


        pts = np.array([P_LU,P_RU,P_RD,P_LD])
        pts = pts.reshape((-1,1,2))
        cv2.polylines(img_cpy,[pts],True,(0,0,255),3)
        # DISP_IMAGE('img_cpy',img_cpy,0)

        if(loop_cnt == 0):
            loop_cnt = 1
            cv2.setMouseCallback("img_cpy", mouse_event)

        # 射影変換座標 [[左上],[右上],[左下],[右下]]
        pts_src = np.float32([ P_LU , P_RU , P_LD , P_RD ])
        pts_dst = np.float32([[0,0],[dst_w,0],[0,dst_h],[dst_w,dst_h]])

        # 射影変換
        M = cv2.getPerspectiveTransform( pts_src , pts_dst )
        img_trn = cv2.warpPerspective( img , M , ( dst_w , dst_h ))
        # DISP_IMAGE('img_trn',img_trn,0)

        img_trn_h = img_trn.shape[0]                                                # 高さ取得
        img_trn_w = img_trn.shape[1]                                                # 幅取得
        img_trn_ctr = (int(img_trn_w/2), int(img_trn_h/2))                          # 回転中心設定
        img_trn_trs = cv2.getRotationMatrix2D(img_trn_ctr, 8 , 1.0)                 # 回転定義
        img_trn_rot = cv2.warpAffine(img_trn, img_trn_trs , (img_trn_w,img_trn_h))  # アフィン変換


        img_gry = cv2.cvtColor(img_trn_rot, cv2.COLOR_BGR2GRAY)
        ret, img_bin = cv2.threshold(img_gry , 30, 255 , cv2.THRESH_BINARY_INV )
        DISP_IMAGE('img_bin' , img_bin , 1)

        threshold1 = 0
        threshold2 = 100

        threshold1 = 0
        threshold2 = 45

        edge_img = cv2.Canny(img_gry, threshold1, threshold2)

        # セグメント領域処理
        dsp_num = ""
        for i in range(8):
            tmp_X = int(SEG_X - i * S_S_X)
            tmp_Y = int(SEG_Y + i * S_S_Y)

            img_crp = edge_img[tmp_Y : tmp_Y + SEG_H , tmp_X : tmp_X + SEG_W ]
            rtn = chk_crop_image( img_crp , tmp_X , tmp_Y , SEG_W , SEG_H)
            dsp_num = rtn+dsp_num

        cv2.putText(edge_img, dsp_num , (100, edge_img.shape[0]-50), cv2.FONT_HERSHEY_PLAIN, 8, (255, 255, 255), 5, cv2.LINE_AA)
        DISP_IMAGE('edge_img',edge_img,1)

        cv2.putText(img_trn_rot, dsp_num , (100, edge_img.shape[0]-50), cv2.FONT_HERSHEY_PLAIN, 8, (0, 0, 255), 5, cv2.LINE_AA)
        DISP_IMAGE('img_trn_rot',img_trn_rot,1)


        k = cv2.waitKey(1)
        if k == 27:
            break
        elif k==ord('c'):
            dsp_str = DISP_7SEG_RANDAM()

    grabResult.Release()

# Releasing the resource
camera.StopGrabbing()
cv2.destroyAllWindows()
まとめ
黄色のLED検討は保留していましたが、もう少し工夫すれば、ある程度使えそうな気がします。