
概要
1つの対象物を異なる角度から撮影したり、複数の対象物を同時撮影したい場合に利用する為に、2カメラ撮影後、撮影画像を連結する python プログラムを作成しましたので記載します。
◆検証環境◆
① OS : Windows10 64bit
② 言語 : python + OpenCV + pypylon
③ 装置 : Basler acA2500-14um(USB3) ※ 2台
結果
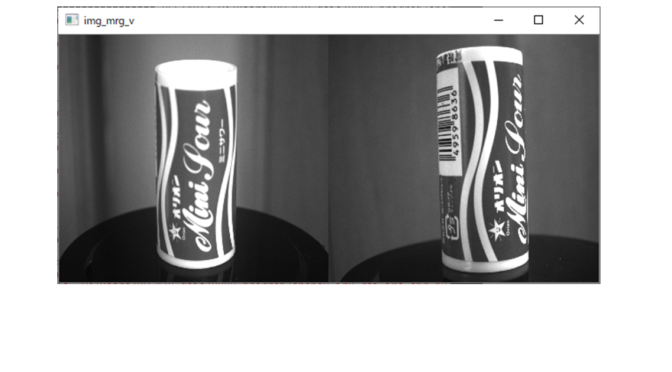
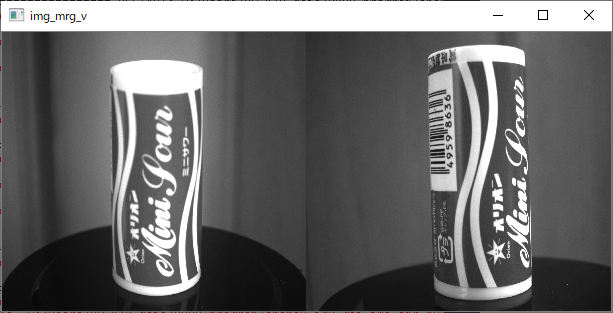
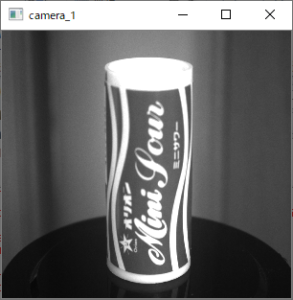
(3) (4)にカメラ1,2の単体画像を示します。(1) (2) は単体画像を横方向・縦方向に連結した結果です。
(1)横方向連結(カメラ1・2連結画像)
(2)縦方向連結(カメラ1・2連結画像)

(3)カメラ1画像
(4)カメラ2画像

プログラム① (基本)
このプログラムの私にとってのポイントは、カメラ本体記載のシリアル番号(S/N)で、対象カメラを指定できることです。行番11~12でカメラ1のシリアル番号を設定し、行番13でカメラ1インスタンスを生成します。 同様に行番17~19でカメラ2のインスタンスを生成しています。
以後、GitHubにあるサンプルコード(opencv.py)を参考に2カメラ対応プログラムを作成しました。
2カメラ画像の連結は、横方向連結は画像高さが同じであること。縦方向連結は画像幅が同じであることが条件です。この条件を満たせば連結は簡単で、行番62(横連結),行番68(縦連結)となっています。
# Basler acA2500-14um (USB3)   画像幅・高さ(1944X2592)

from pypylon import pylon
import cv2
# import numpy as np

s_n_1 = "********"
s_n_2 = "********"

# シリアルナンバー指定によるデバイス起動1
inf1 = pylon.DeviceInfo()
inf1.SetSerialNumber(s_n_1)
cmr1 = pylon.InstantCamera(pylon.TlFactory.GetInstance().CreateFirstDevice(inf1))
cmr1.StartGrabbing(pylon.GrabStrategy_LatestImageOnly)

# シリアルナンバー指定によるデバイス起動2
inf2 = pylon.DeviceInfo()
inf2.SetSerialNumber(s_n_2)
cmr2 = pylon.InstantCamera(pylon.TlFactory.GetInstance().CreateFirstDevice(inf2))
cmr2.StartGrabbing(pylon.GrabStrategy_LatestImageOnly)

# 取得データコンバータ設定(opencv bgr format)
converter = pylon.ImageFormatConverter()
converter.OutputPixelFormat = pylon.PixelType_BGR8packed
converter.OutputBitAlignment = pylon.OutputBitAlignment_MsbAligned

# 連続撮影
while cmr1.IsGrabbing() and cmr2.IsGrabbing():

    # カメラ1
    img_1 = None
    g_Rslt1 = cmr1.RetrieveResult(5000, pylon.TimeoutHandling_ThrowException)
    if g_Rslt1.GrabSucceeded():
        image_1 = converter.Convert(g_Rslt1)
        img_1 = image_1.GetArray()

    g_Rslt1.Release()

    # カメラ2
    img_2 = None
    g_Rslt2 = cmr2.RetrieveResult(5000, pylon.TimeoutHandling_ThrowException)
    if g_Rslt2.GrabSucceeded():
        image_2 = converter.Convert(g_Rslt2)
        img_2 = image_2.GetArray()

    g_Rslt2.Release()


    # カメラ1・2画像合成
    if (not img_1 is None) and (not img_2 is None) :

        # cv2.namedWindow('camera_1', cv2.WINDOW_NORMAL)
        # cv2.imshow('camera_1', img_1)
        # cv2.namedWindow('camera_2', cv2.WINDOW_NORMAL)
        # cv2.imshow('camera_2', img_2)

        h1, w1, c1 = img_1.shape    # 画像幅・高さ取得
        h2, w2, c2 = img_2.shape    # 画像幅・高さ取得

        # 横方向合成
        if h1 == h2:
            img_merge_v = cv2.hconcat([img_1, img_2])
            cv2.namedWindow('img_mrg_v', cv2.WINDOW_NORMAL)
            cv2.imshow('img_mrg_v', img_merge_v)

        # 縦方向合成
        # if w1 == w2:
        #     img_merge_h = cv2.vconcat([img_1, img_2])
        #     cv2.namedWindow('img_mrg_h', cv2.WINDOW_NORMAL)
        #     cv2.imshow('img_mrg_h', img_merge_h)

    k = cv2.waitKey(1)
    if k == 27:
        break

# デバイス開放
cmr1.StopGrabbing()
cmr2.StopGrabbing()

cv2.destroyAllWindows()
プログラム② (発展)
基本プログラムでは、 カメラ本体記載のシリアル番号(S/N) をプログラム内に直接記載しましたが、このプログラムでは接続されているカメラを自動認識・撮影します。同じ解像度のカメラであれば、接続数によって、プログラムを書き換える必要はありません。
# Basler acA2500-14um (USB3)   画像幅・高さ(1944X2592)

from pypylon import pylon
import cv2


# 撮影中チェック用
def CAMERA_IsGrabbing(CAMERA_ARY):
    chk_rslt = True
    for CMR in CAMERA_ARY :
        if not CMR.IsGrabbing() :
            chk_rslt = False
    return chk_rslt

# 撮影停止
def CAMERA_StopGrabbing(CAMERA_ARY):
    for CMR in CAMERA_ARY :
        CMR.StopGrabbing()


tlFactory = pylon.TlFactory.GetInstance()
devices = tlFactory.EnumerateDevices()
cameras = pylon.InstantCameraArray(len(devices))

MDL_ARY = []
S_N_ARY = []
CMR_ARY = []

# 撮影開始
for i, cam in enumerate(cameras):
    # 下記 4行は参考。本プログラム機能上は不要。
    cam.Attach(tlFactory.CreateDevice(devices[i]))
    MDL_ARY.append(cam.GetDeviceInfo().GetModelName())      # GET DEVICE MODEL
    S_N_ARY.append(cam.GetDeviceInfo().GetSerialNumber())   # GET DEVICE Serial Number
    # print("No", i ," ,  Model: ", MDL_ARY[i] , "  ,  S/N: ", S_N_ARY[i])

    # 撮影開始
    CMR_ARY.append(pylon.InstantCamera(pylon.TlFactory.GetInstance().CreateDevice(devices[i])))
    CMR_ARY[i].StartGrabbing(pylon.GrabStrategy_LatestImageOnly)

# 取得データコンバータ設定(opencv bgr format)
converter = pylon.ImageFormatConverter()
converter.OutputPixelFormat = pylon.PixelType_BGR8packed
converter.OutputBitAlignment = pylon.OutputBitAlignment_MsbAligned

# 連続撮影
while CAMERA_IsGrabbing(CMR_ARY) :
    IMG_ARY = []
    # cnt_grab_success = 0

    # カメラ画像取得
    for idx in range(len(CMR_ARY)):
        IMG_ARY.append(None)

        tmp_Rslt = CMR_ARY[idx].RetrieveResult(5000, pylon.TimeoutHandling_ThrowException)

        if tmp_Rslt.GrabSucceeded():
            tmp_img = converter.Convert(tmp_Rslt)
            IMG_ARY[idx] = tmp_img.GetArray()
            # cnt_grab_success += 1

        tmp_Rslt.Release()

    # 画像マージ実行(全カメラ画像取得成功時)
    # 全画像高さが同じであること
    if len(CMR_ARY) == len(IMG_ARY) :
        for idx in range(len(IMG_ARY)):
            if idx == 0 :
                img_merged = IMG_ARY[idx]
            else :
                img_merged = cv2.hconcat([img_merged, IMG_ARY[idx]])

        cv2.namedWindow('img_merged', cv2.WINDOW_NORMAL)
        cv2.imshow('img_merged', img_merged)


    k = cv2.waitKey(1)
    if k == 27:
        break

CAMERA_StopGrabbing(CMR_ARY)        # デバイス解放
cv2.destroyAllWindows()
まとめ
少し離れたところにある複数の7セグLED解析を1つのパソコンで行いたかったので、今回の検討をしています。
また、同じ対象物でも異なる角度から複合的に解析することで、精度向上等に活用出来るかもしれません。