
概要
秋月電子通商販売のLCD(20×4行)を使います。
接続は下図の通りです。前投稿で使用したLCD(16×2行)と使い方は、ほぼ同じですが、幾分コマンド等が異なります。
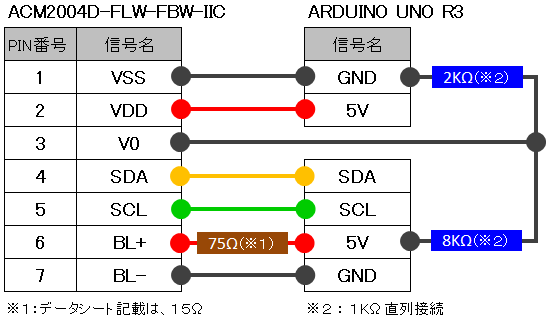
バックライト付 [ACM2004D-FLW-FBW-IIC]
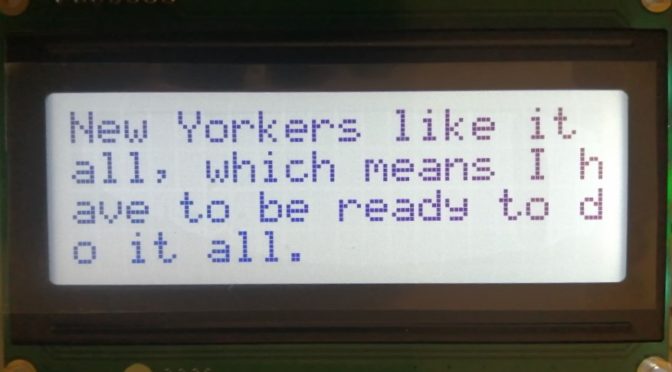
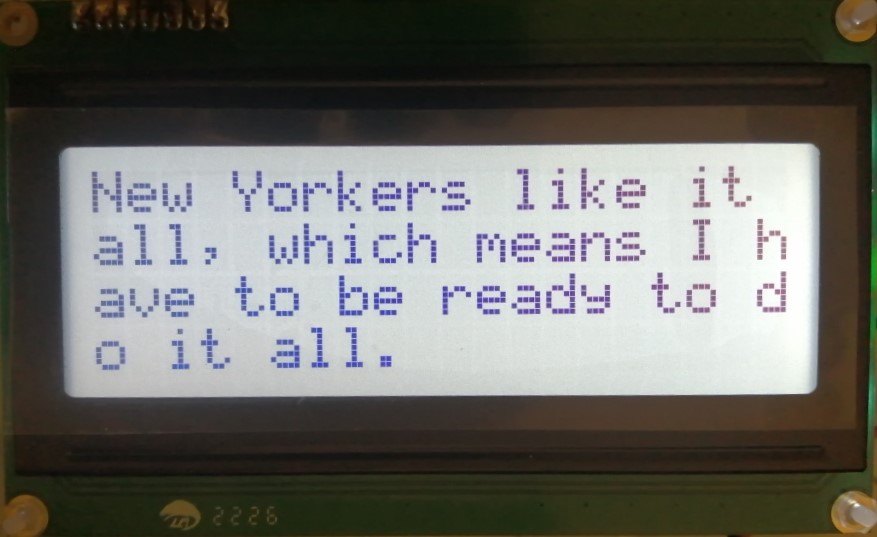
出力結果(表示状態)
出力結果です。
プログラム
2つの表示パターンを3秒毎に切り換え表示するものです。
先回のLCD[ACM1602NI-FLW-FBW-M01]もI2C接続し、2つのLCD表示を切り替えるプログラムにしています。
#include <Wire.h>
const uint8_t dvs_adrs[] = { 0x50 , 0x3F }; // DVS1,DVS2
char str1[] = {"Don't hesitate to ask for help."};
char str2[] = {"New Yorkers like it all, which means I have to be ready to do it all."};
char* str_ary1[]={ "How's it going?", "It's going well." };
char* str_ary2[]={"ACM1602NI-FLW-FBW-M1",
"P-05693 @1700-" ,
"85x33.5x13.5mm",
"16charx2line"
};
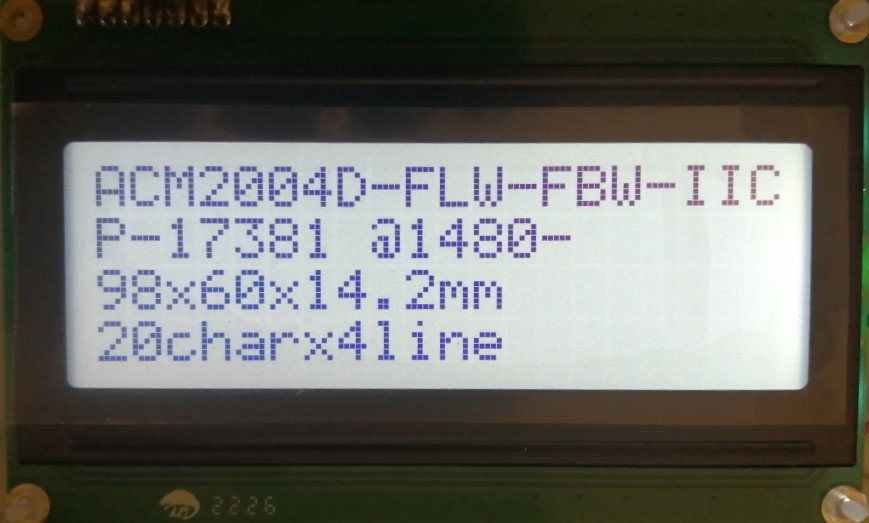
char* str_ary3[]={"ACM2004D-FLW-FBW-IIC",
"P-17381 @1480-" ,
"98x60x14.2mm",
"20charx4line"
};
byte blk = 0x20 ; // スペース
// 初期設定
void setup() {
Wire.begin(); // join i2c bus (address optional for master)
pinMode(SDA, INPUT); // I2C内部プルアップ無効化
pinMode(SCL, INPUT); // I2C内部プルアップ無効化
lcdinit(0); // LCD初期化(DVS1)
lcdinit(1); // LCD初期化(DVS2)
}
// メイン処理
void loop() {
transDataToLcd( 0 , 0 , 0x01 , 10); // 画面消去(DVS1)
transDataToLcd( 1 , 0 , 0x01 , 10); // 画面消去(DVS2)
lcd_Disp_Str(0 , str1); // 文字表示(DVS1)
lcd_Disp_Str(1 , str2); // 文字表示(DVS2)
// for (int i = 0; i < 4; i++){ // 文字表示(DVS2)
// char* tmp = str_ary2[i];
// lcd_DispStrAry( 1, tmp , i );
// }
delay(3000);
transDataToLcd( 0 , 0 , 0x01 , 10); // 画面消去(DVS1)
transDataToLcd( 1 , 0 , 0x01 , 10); // 画面消去(DVS2)
for (int i = 0; i < 2; i++){ // 文字表示(DVS1)
char* tmp = str_ary1[i];
lcd_DispStrAry( 0, tmp , i );
}
for (int i = 0; i < 4; i++){ // 文字表示(DVS2)
char* tmp = str_ary3[i];
lcd_DispStrAry( 1, tmp , i );
}
delay(3000);
}
// 文字表示1(1文を複数行に分けて表示)
// dvs_no(0:DVS1、 1:DVS2)
void lcd_Disp_Str(int dvs_no , char* str){
int l_cnt = 16 ;
int ln_cn = 2 ;
if(dvs_no!=0){
l_cnt = 20 ;
ln_cn = 4 ;
}
for(int j = 0; j < ln_cn ; j++){
pos_cursor( dvs_no , j , 0); //座標指定
for(int i = 0;i < l_cnt ;i++){
if(*str == '\0'){
transDataToLcd( dvs_no , 1 , blk , 0);
}else{
transDataToLcd( dvs_no , 1 , *str++ , 0);
}
}
}
}
// 文字表示2(1文を各行に表示)
// dvs_no(0:DVS1、 1:DVS2)
void lcd_DispStrAry(int dvs_no , char* str , int l_n ){
int l_cnt = 16 ;
if(dvs_no!=0){ l_cnt = 20 ; }
pos_cursor( dvs_no , l_n , 0); //座標指定
for(int i = 0 ; i < l_cnt ; i++){
if(*str == '\0'){
transDataToLcd( dvs_no , 1 , blk , 0);
}else{
transDataToLcd( dvs_no , 1 , *str++ , 0);
}
}
}
// LCD初期化
// dvs_no(0:DVS1、 1:DVS2)
void lcdinit(int dvs_no) {
if(dvs_no == 0){
transDataToLcd( 0 , 0 , 0x01 , 10); //画面消去
transDataToLcd( 0 , 0 , 0x38 , 10); //ファンクション設定
//transDataToLcd( 0 , 0 , 0x0F , 10); //ディスプレイON、CURSOR-ON、blinking-ON
transDataToLcd( 0 , 0 , 0x0C , 10); //ディスプレイON、CURSOR-OFF、blinking-OFF
transDataToLcd( 0 , 0 , 0x06 , 10); //データ書き込み後アドレス加算モード設定
} else {
transDataToLcd( 1 , 0 , 0x01 , 10); //画面消去
transDataToLcd( 1 , 0 , 0x38 , 10); //ファンクション設定
//transDataToLcd( 1 , 0 , 0x0F , 10); //ディスプレイON、CURSOR-ON、blinking-ON
transDataToLcd( 1 , 0 , 0x0C , 10); //ディスプレイON、CURSOR-OFF、blinking-OFF
transDataToLcd( 1 , 0 , 0x06 , 10); //データ書き込み後アドレス加算モード設定
}
}
// LCDデータ送信
// dvs_no(0:DVS1、 1:DVS2)
// typ_d ( 0:コマンド、1:データ )
// trsDat( コマンド、もしくはデータ )
// dTime ( データ送信後、待機時間 )
void transDataToLcd(int dvs_no , int typ_d , byte trsDat , int dTime){
byte typCmd = 0x00 ;
if(typ_d != 0){
if(dvs_no == 0){ typCmd = 0x80 ; }
else{ typCmd = 0x40 ; }
}
Wire.beginTransmission(dvs_adrs[dvs_no]);
Wire.write(typCmd);
Wire.write(trsDat);
Wire.endTransmission();
if(dTime>0){ delay(dTime); }
}
// 表示位置指定(カーソル座標指定)
// dvs_no(0:DVS1、 1:DVS2)
// loc_x (0:1行目、1:2行目)
// loc_y (0:最左、15:再右)
void pos_cursor(int dvs_no , int loc_x , int loc_y){
byte p_inf = 0x80 + loc_y;
if(loc_x == 1){ p_inf = 0x80 + 0x40 + loc_y; }
else if(loc_x == 2){ p_inf = 0x80 + 0x14 + loc_y; }
else if(loc_x == 3){ p_inf = 0x80 + 0x54 + loc_y; }
transDataToLcd( dvs_no , 0 , p_inf , 5);
}まとめ
秋月電子通商にサンプルプログラムがあり、参考になります。