
処理概要
先回の投稿でも、PYTHONとOPENCVを使って秒針を読みましたが、今回は処理ロジックを変更しています。
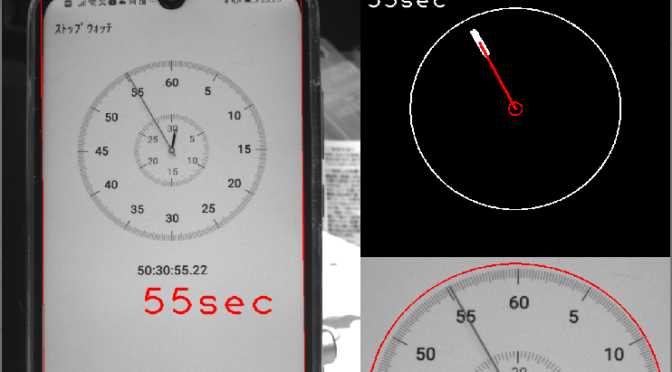
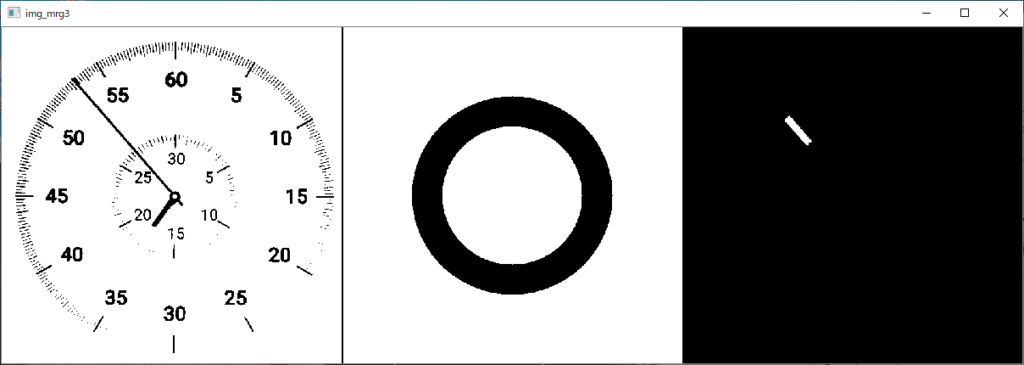
考え方は、下図の通り2値化処理したストップウォッチ画像(左)とマスク画像(中央)をアンド処理・膨張処理すると下図右の様に秒針部のみの画像を取得することが出来ます。取得した秒針部の重心座標と回転軸中心座標から秒針の傾きを求めることが出来ます。この傾きから更に目盛(秒)の値を計算します。
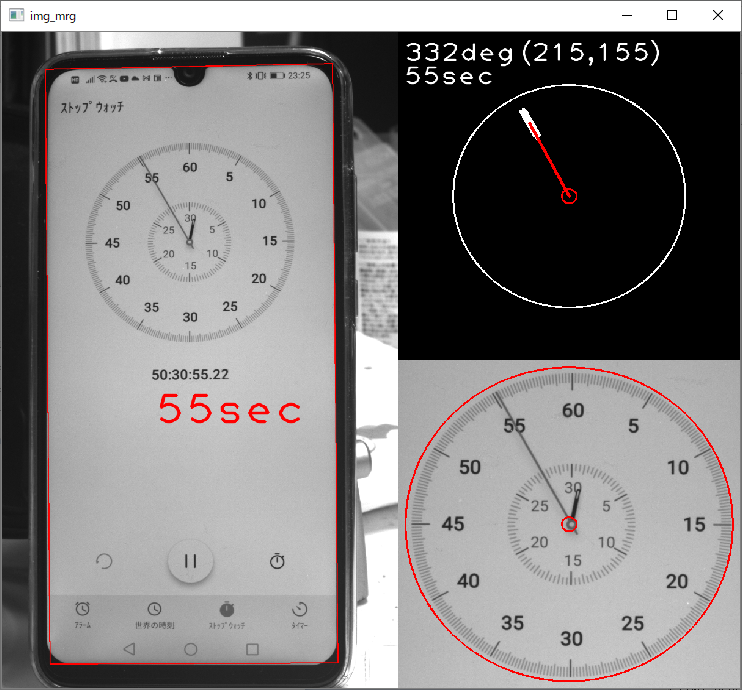
下の右上図は秒針部の重心座標と回転軸中心座標を赤い直線でつないでいます。この直線の傾きから経過時間を計算します。
秒針解析状況動画
解析状況の動画です。4倍速再生しています。
プログラム(python+OpenCV)
プログラムコードです。
from pypylon import pylon
import cv2
import numpy as np
import time
import math

# conecting to the first available camera
camera = pylon.InstantCamera(pylon.TlFactory.GetInstance().CreateFirstDevice())

# Grabing Continusely (video) with minimal delay
camera.StartGrabbing(pylon.GrabStrategy_LatestImageOnly)
converter = pylon.ImageFormatConverter()

# converting to opencv bgr format
converter.OutputPixelFormat = pylon.PixelType_BGR8packed
converter.OutputBitAlignment = pylon.OutputBitAlignment_MsbAligned

P_LU=[120,108]              # [左上] 射影変換[X,Y]
P_RU=[918,91]               # [右上] 射影変換[X,Y]
P_RD=[933,1827]             # [右下]  射影変換[X,Y]
P_LD=[133,1830]             # [左下]  射影変換[X,Y]

#携帯サイズ 73.4 X 155.2
dst_w=721                   # WINDOW幅
dst_h=1552                  # WINDOW高さ

cnt_w=round(dst_w/2)-4      # 時計中心(X)
cnt_h=457                   # 時計中心(Y)
cnt_r=280                   # 切り取り領域

scale = 1.0                 # スケールを指定
ctr_rot = (cnt_r, cnt_r)    # 回転中心

threshold = 140             # 二値化閾値
angle = 0
pixel_thrsh = 100           # 秒針とチェック矩形枠の重なるピクセル数


while camera.IsGrabbing():
    grabResult = camera.RetrieveResult(5000, pylon.TimeoutHandling_ThrowException)

    if grabResult.GrabSucceeded():
        # Access the image data
        image = converter.Convert(grabResult)
        img = image.GetArray()

        # 画像の大きさを取得
        height, width, channels = img.shape[:3]

        # 対象サイズ程度にクロップ・リサイズ
        img1 = img[5 : 1905, round(width/2) - 550 : round(width/2) + 550 ]
        hgt1, wdt1, chnls1 = img1.shape[:3]

        pts = np.array([P_LU,P_RU,P_RD,P_LD])
        pts = pts.reshape((-1,1,2))
        cv2.polylines(img1,[pts],True,(0,0,255),2)
        img1_resize = cv2.resize(img1, (int(1100*1120/1900),1120))

        # 射影変換
        pts_src = np.float32([ P_LU , P_RU , P_LD , P_RD ])
        pts_dst = np.float32([[0,0],[dst_w,0],[0,dst_h],[dst_w,dst_h]])
        M = cv2.getPerspectiveTransform( pts_src , pts_dst )
        img_trn = cv2.warpPerspective( img1 , M , ( dst_w , dst_h ))

        # 時計部 正方形領域をクロップ
        img_wch = img_trn[ cnt_h - cnt_r : cnt_h + cnt_r , cnt_w - cnt_r : cnt_w + cnt_r ]
        img_gray = cv2.cvtColor(img_wch, cv2.COLOR_BGR2GRAY)
        ret,img_thrsh = cv2.threshold(img_gray , threshold , 255 , cv2.THRESH_BINARY)

        cv2.circle(img_wch, (cnt_r, cnt_r), 12, (0, 0, 255), thickness=2)
        cv2.circle(img_wch, (cnt_r, cnt_r), 268, (0, 0, 255), thickness=2)


        # マスク作成 (黒(0)に塗り潰し、反転し白(1)にする)
        h, w = img_thrsh.shape[:2]
        mask = cv2.bitwise_not(np.zeros((h, w), dtype=np.uint8))
        cv2.circle(mask, center=(cnt_r, cnt_r), radius=165, color=0, thickness=-1)
        cv2.circle(mask, center=(cnt_r, cnt_r), radius=115, color=255, thickness=-1)

        img_dst = cv2.bitwise_or(img_thrsh, mask)                       # マスク処理→「秒針」部抽出

        kernel = cv2.getStructuringElement(cv2.MORPH_CROSS, (11, 11))
        img_dst = cv2.bitwise_not(cv2.erode(img_dst, kernel))           # 収縮処理
        mu = cv2.moments(img_dst, False)                                # 重心計算
        x,y= int(mu["m10"]/mu["m00"]) , int(mu["m01"]/mu["m00"])        # 重心計算
        res_ang = math.degrees(math.atan2( y - cnt_r , x - cnt_r ))     # 角度計算

        # 秒針0秒位置からの角度に変換
        if res_ang >= -90 :
            res_ang = res_ang + 90
        else:
            res_ang = res_ang + 450

        sec_trs= round( 60 * res_ang / 360)                             # 角度を秒変換

        # 二値化画像をカラー画像変換、秒針部等の計測情報描画
        img_dst_rgb = cv2.cvtColor(img_dst,cv2.COLOR_GRAY2RGB)
        cv2.circle(img_dst_rgb, (cnt_r, cnt_r), 12, (0, 0, 255), thickness=2)
        cv2.putText(img_dst_rgb, "(" + str(x) + "," + str(y) + ")" , (200, 50), cv2.FONT_HERSHEY_PLAIN, 3,(255, 255, 255), 2, cv2.LINE_AA)
        cv2.putText(img_dst_rgb, "" + str(int(res_ang)) + "deg" + "" , (10, 50), cv2.FONT_HERSHEY_PLAIN, 3,(255, 255, 255), 2, cv2.LINE_AA)
        cv2.putText(img_dst_rgb, "" + str(int(sec_trs)) + "sec" + "" , (10, 90), cv2.FONT_HERSHEY_PLAIN, 3,(255, 255, 255), 2, cv2.LINE_AA)
        cv2.line(img_dst_rgb, ctr_rot , (x, y), (0, 0, 255), thickness=3 , lineType = cv2.LINE_4 )
        cv2.circle(img_dst_rgb, (cnt_r, cnt_r), 190, (255, 255, 255), thickness=2)

        # 結果表示
        img_mrg1 = cv2.vconcat([img_dst_rgb , img_wch])                 # 2画像を縦連結
        img_mrg2 = cv2.hconcat([img1_resize, img_mrg1])                 # 2画像を縦連結
        cv2.putText(img_mrg2, "" + str(sec_trs)+"sec", (250, 670), cv2.FONT_HERSHEY_PLAIN, 5,(0, 0, 255), 3, cv2.LINE_AA)

        cv2.namedWindow('img_mrg', cv2.WINDOW_NORMAL)
        cv2.imshow('img_mrg', img_mrg2)


        img_mrg3 = cv2.hconcat([img_thrsh, mask,img_dst])               # 画像を縦連結
        cv2.line(img_mrg3, (w,0) , (w, h), (0, 0, 0), thickness=2 , lineType = cv2.LINE_4 )
        cv2.namedWindow('img_mrg3', cv2.WINDOW_NORMAL)
        cv2.imshow('img_mrg3', img_mrg3)

        time.sleep(0.1)

        k = cv2.waitKey(1)
        if k == 27:
            break
    grabResult.Release()

# Releasing the resource
camera.StopGrabbing()

cv2.destroyAllWindows()
まとめ
私の学習ポイントは円形マスクの形成です。先回のプログラムよりシンプルになった様に思います。
あと、カメラと時計の位置決めや明るさの変化に対応できるとよいのですが・・・。