
概要
今回は、Power Point のCustom User Interface を作成し、VBAで、次の3つの処理を実行します。
① 起動時にテキストボックス・図形・線の既定色等を設定
② editBox入力値から、データ検索・結果を表示する処理
③ メニューボタン選択により、図形の色・透明度等を変更
②③処理は下記動画にて概要を確認します。メッセージボックス,選択ボタン等がキャプチャー出来ていないので、かなり判りにくいと思いますが、ご容赦下さい。
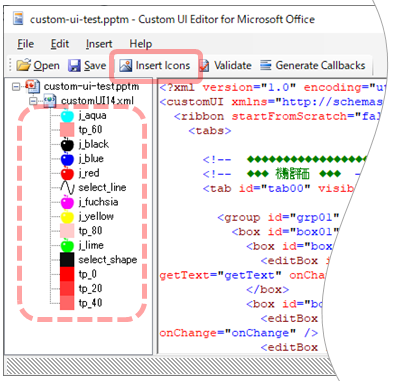
XML編集
作成したCUSTOM UI は下図です。

このCUSTOM UIを形成するXMLは次の通りです。
OFFICE-CUSTOM-UI-EDITORで編集します。
<?xml version="1.0" encoding="utf-8"?>
<customUI xmlns="http://schemas.microsoft.com/office/2009/07/customui" onLoad="onLoad">
  <ribbon startFromScratch="false">
    <tabs>

      <tab id="tab00" visible="true" label="MyCustomTab" >

        <group id="grp01" label="名前から電話番号を検索する風のデモ">
          <box id="box01" boxStyle="vertical">
		<box id="box02">
              <editBox id="editBox01" label="氏名" imageMso="CondolatoryEvent" maxLength="12" sizeString="WWWWWMMMMMWW" getText="getText" onChange="onChange" />
            </box>
            <box id="box03">
              <editBox id="editBox02" label="電話" imageMso="AutoDial" maxLength="4" sizeString="WWWW" getText="getText" onChange="onChange" />
              <editBox id="editBox03" maxLength="4" sizeString="WWWW" getText="getText" onChange="onChange" />
              <editBox id="editBox04" maxLength="4" sizeString="WWWW" getText="getText" onChange="onChange" />
		</box>
	    </box>
	    <separator id="separator01" />
          <button id="btn01" label="電話番号検索" imageMso="HappyFace" size="large" onAction="onAction" />

        </group>

        <group id="grp02" label="色設定" >
          <menu id="menu01" itemSize="large" size="large" getLabel="getLabel" getImage="getImage" >
		<button id="btn02" tag="0" onAction="get_color" label="aqua" image="j_aqua" />
		<button id="btn03" tag="1" onAction="get_color" label="black" image="j_black" />
		<button id="btn04" tag="2" onAction="get_color" label="blue" image="j_blue" />
		<button id="btn05" tag="3" onAction="get_color" label="fuchsia" image="j_fuchsia" />
		<button id="btn06" tag="4" onAction="get_color" label="lime" image="j_lime" />
		<button id="btn07" tag="5" onAction="get_color" label="red" image="j_red" />
		<button id="btn08" tag="6" onAction="get_color" label="yellow" image="j_yellow" />
	    </menu>
          <menu id="menu02" itemSize="large" size="large" getLabel="getLbl_transparency" imageMso="BehindText" >
		<button id="btn10" tag="0" onAction="set_transparency" label="0%" image="tp_0" />
		<button id="btn11" tag="20" onAction="set_transparency" label="20%" image="tp_20" />
		<button id="btn12" tag="40" onAction="set_transparency" label="40%" image="tp_40" />
		<button id="btn13" tag="60" onAction="set_transparency" label="60%" image="tp_60" />
		<button id="btn14" tag="80" onAction="set_transparency" label="80%" image="tp_80" />
	    </menu>
          <menu id="menu03" itemSize="large" size="large" getLabel="getLbl_selectTaget" getImage="getImageTgt" >
		<button id="btn15" tag="0" onAction="set_target_object_type" label="line" image="select_line" />
		<button id="btn16" tag="1" onAction="set_target_object_type" label="shape" image="select_shape" />
	    </menu>

        </group>

      </tab>

    </tabs>

  </ribbon>
</customUI>
20行目の「 imageMso=”HappyFace” 」 と記載することで、表示するアイコン画像を指定します。 imageMso はマイクロソフトOFFICEの組み込み画像で、 “HappyFace”は黄色のスマイル画像を特定するものです。 OFFICEバージョンによって使用できるアイコンは多少違いがある様です。
マイクロソフト公式サイトでアイコンリストを探しましたが、見つけられませんでした。公式ではありませんが、一覧表を公開されているHPがありますので活用させて頂きました。
一方、次の図の通り自分で用意したカスタムアイコンを使用することもできます。「Insert Icons」をクリックし対象画像ファイルを取り込みます。アイコン画像は 32X32 (pixel)にしています。
XMLでは、「 image=”j_aqua”」の様に対象アイコン画像を指定しています。
図形・他の既定色等を設定
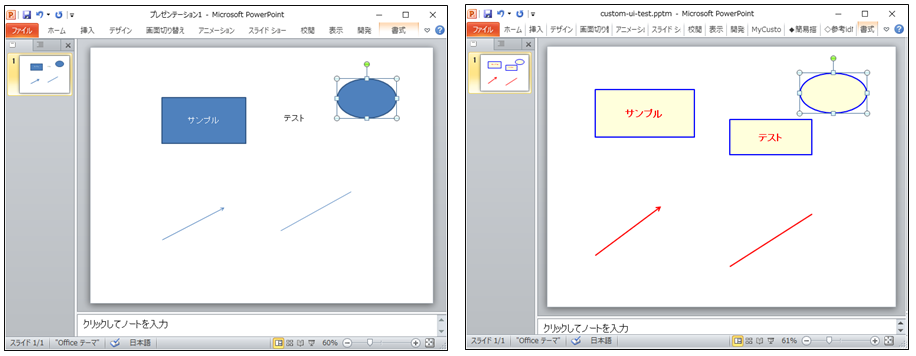
PowerPoint を普通に起動し、図形・テキストボックス等を挿入すると下図の左側の様になります。文字フォント・色等の規定値を標準設定する方法があるのかもしれませんが、判りませんでしたのでVBAで初期設定することにしました。下図の右側が設定例です。文字フォント・色 以外にも 枠線の太さ・文字サイズ・透明性等を初期設定出来ます。
XML 2行目の onLoad=”onLoad” は、読込時に実行する関数を定義しています。
XMLで定義した読み込み時に最初に実行される “onLoad” 関数をVBA側で次の様に設定し、更に “add_shape_default_set” を呼び出します。ここで既定値を設定しています。
手順は人同様です。スライド追加、テキストボックス配置後、文字位置・マージン・文字サイズ・フォント・文字色・塗り潰し色・枠線色等を設定します。次に “ SetShapesDefaultProperties ” を実行し、規定値として設定します。
同様に図形(shape), 直線(line)を追加、必要項目設定後、それぞれ既定値設定します。最後にスライドを抹消し、初期設定を終えます。
'◆◆◆◆◆ 起動時初期設定 ◆◆◆◆◆
Sub onLoad(ribbon As IRibbonUI)

    Call add_shape_default_set          '追加SHAPEのデフォルト設定

End Sub

Public Sub add_shape_default_set()

    Dim act_prs As Presentation
    Dim sld As Slide
    Dim txt As Shape

    Set act_prs = ActivePresentation
    Set sld = act_prs.Slides.Add(Index:=1, Layout:=ppLayoutText)
    Set txt = sld.Shapes.AddTextbox(Orientation:=msoTextOrientationHorizontal, Left:=50, Top:=50, Width:=120, Height:=40)

    txt.Name = "AddedTextBox"
    txt.TextFrame.TextRange = "サンプル"
    txt.TextFrame.TextRange.ParagraphFormat.Alignment = ppAlignCenter
    txt.TextFrame.VerticalAnchor = msoAnchorMiddle

    txt.TextFrame.MarginLeft = 0
    txt.TextFrame.MarginRight = 0
    txt.TextFrame.MarginTop = 0
    txt.TextFrame.MarginBottom = 0
    txt.TextFrame.AutoSize = ppAutoSizeNone

    txt.TextEffect.FontSize = 20
    txt.TextEffect.FontBold = msoTrue
    txt.TextFrame.TextRange.Font.Name = "MS Pゴシック"
    txt.TextFrame.TextRange.Font.NameComplexScript = "MS Pゴシック"
    txt.TextFrame.TextRange.Font.NameFarEast = "MS Pゴシック"
    txt.TextFrame.TextRange.Font.Color.RGB = RGB(255, 0, 0)                 '文字色

    txt.Fill.Visible = msoTrue
    txt.Fill.ForeColor.RGB = RGB(255, 255, 220)                             'ボックス内部色(薄黄色)

    txt.Line.Visible = msoTrue
    txt.Line.Weight = 2
    txt.Line.ForeColor.RGB = RGB(0, 0, 255)                                 '枠線色(青)

    txt.SetShapesDefaultProperties                                          'デフォルトプロパティに設定


    Set txt = sld.Shapes.AddLine(BeginX:=100, BeginY:=100, EndX:=200, EndY:=200)
    txt.Line.ForeColor.RGB = RGB(255, 0, 0)                                 '直線色
    txt.Line.Weight = 3
    txt.SetShapesDefaultProperties                                          'デフォルトプロパティに設定

    Set txt = sld.Shapes.AddShape(Type:=msoShapeRectangle, Top:=70, Left:=200, Width:=100, Height:=120)
    txt.Fill.ForeColor.RGB = RGB(255, 255, 220)                             'ボックス内部色(薄黄色)
    txt.Line.Weight = 2
    txt.Line.ForeColor.RGB = RGB(0, 0, 255)                                 '枠線色(青)

    txt.TextFrame.TextRange = "サンプル"
    txt.TextFrame.TextRange.ParagraphFormat.Alignment = ppAlignCenter
    txt.TextFrame.VerticalAnchor = msoAnchorMiddle

    txt.TextFrame.MarginLeft = 0
    txt.TextFrame.MarginRight = 0
    txt.TextFrame.MarginTop = 0
    txt.TextFrame.MarginBottom = 0
    txt.TextFrame.AutoSize = ppAutoSizeNone

    txt.TextEffect.FontSize = 20
    txt.TextEffect.FontBold = msoTrue
    txt.TextFrame.TextRange.Font.Name = "MS Pゴシック"
    txt.TextFrame.TextRange.Font.NameComplexScript = "MS Pゴシック"
    txt.TextFrame.TextRange.Font.NameFarEast = "MS Pゴシック"
    txt.TextFrame.TextRange.Font.Color.RGB = RGB(255, 0, 0)                 '文字色

    txt.SetShapesDefaultProperties                                          'デフォルトプロパティに設定

    sld.Select

    sld.Delete

End Sub
editBox入力値についてデータ検索
次は「電話番号検索」ボタンクリック時に、氏名に入力されている名前から、電話番号を検索し表示するデモです。
実際にはデータ検索は行っていませんが、“田中”さん,“鈴木”さんが入力されている場合は電話番号を表示し、それ以外の人の場合は電話番号は消去されます。

プログラムは、次の通りです。
Option Explicit

Private rbn_ui As IRibbonUI     'リボン

Private edtTxt01 As String      'editBox文字列
Private edtTxt02 As String      'editBox文字列
Private edtTxt03 As String      'editBox文字列
Private edtTxt04 As String      'editBox文字列


'◆◆◆◆◆ 起動時初期設定 ◆◆◆◆◆
Sub onLoad(ribbon As IRibbonUI)

    Set rbn_ui = ribbon

    edtTxt01 = "": edtTxt02 = "": edtTxt03 = "": edtTxt04 = ""

    rbn_ui.Invalidate                   'リボン表示更新

End Sub


'◆◆◆◆◆ 検索デモ ◆◆◆◆◆
'コントロールテキスト取得
Sub getText(control As IRibbonControl, ByRef returnedVal) ' editBoxに文字列を代入する

    Dim rtn_tmp
    rtn_tmp = ""

    If control.Id = "editBox01" Then rtn_tmp = edtTxt01
    If control.Id = "editBox02" Then rtn_tmp = edtTxt02
    If control.Id = "editBox03" Then rtn_tmp = edtTxt03
    If control.Id = "editBox04" Then rtn_tmp = edtTxt04
    returnedVal = rtn_tmp

End Sub


'コントール変化時に値取得 (editBoxで[Enter]入力、他コントロール移動時イベント)
Sub onChange(control As IRibbonControl, text As String)

    If control.Id = "editBox01" Then edtTxt01 = text

End Sub


'検索処理想定
Sub onAction(control As IRibbonControl)

    Dim name_input

    name_input = StrConv(StrConv(Trim(edtTxt01), 1), 8)

    If name_input = "" Then
        MsgBox "氏名が未入力です。処理を中断します。", vbOKOnly + vbExclamation, "氏名未設定エラー"
        edtTxt02 = "": edtTxt03 = "": edtTxt04 = ""

    ElseIf Left(name_input, 2) = "鈴木" Then
        MsgBox "鈴木さんの電話番号を確認しました。", vbOKOnly + vbInformation, "電話番号確認!"
        edtTxt02 = "012": edtTxt03 = "345": edtTxt04 = "6789"

    ElseIf Left(name_input, 2) = "田中" Then
        MsgBox "田中さんの電話番号を確認しました。", vbOKOnly + vbInformation, "電話番号確認!"
        edtTxt02 = "9999": edtTxt03 = "8765": edtTxt04 = "4321"

    Else
        MsgBox "知らない人です。処理を中断します。", vbOKOnly + vbExclamation, "知らない人です。"
        edtTxt02 = "": edtTxt03 = "": edtTxt04 = ""

    End If

    rbn_ui.InvalidateControl ("editBox02")
    rbn_ui.InvalidateControl ("editBox03")
    rbn_ui.InvalidateControl ("editBox04")

End Sub
図形の色・透明度等を変更
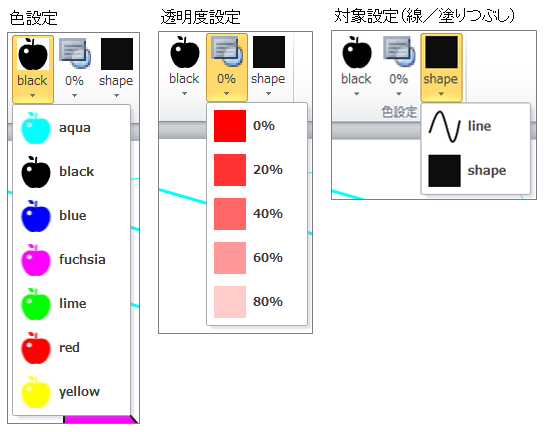
選択したテキストボックス・図形・直線等の色と透明度を設定します。動画ではキャプチャーできていませんが、実際には下図の通りメニューボタン選択時に色・透明度を設定します。複数選択にも対応しています。
最右の line / shape 選択は、テキストボックス・図形の場合、lineは枠線,shapeは内部塗りつぶしを行います。直線の場合、line は有効ですが、shape は無効です。
プログラムは次の通りです。
Option Explicit

Private rbn_ui As IRibbonUI     'リボン

Private color_name              'テキストボックス・shape塗り潰し色設定
Private trans_parency           'テキストボックス・shape透明度設定
Private tgt_type                'テキストボックス・shape透明度設定


'◆◆◆◆◆ 起動時初期設定 ◆◆◆◆◆
Sub onLoad(ribbon As IRibbonUI)

    color_name = "black"
    trans_parency = "0%"
    tgt_type = "shape"

    Set rbn_ui = ribbon

    rbn_ui.Invalidate                   'リボン表示更新

End Sub


'◆◆◆◆◆ 塗り潰し色を設定する ◆◆◆◆◆
'外部画像ファイルを取得設定する
Sub getImage(control As IRibbonControl, ByRef img)
    Set img = LoadPicture(ActivePresentation.Path & "\color_sample\j_" & color_name & ".jpg")
    'Set img = LoadImage(ActivePresentation.Path & "\color_sample\png_" & color_name & ".png")
End Sub

'表示ラベル取得
Sub getLabel(control As IRibbonControl, ByRef lbl)

   lbl = color_name

End Sub

'shape・textBoxに選択色設定
Sub get_color(control As IRibbonControl)

    Dim color_no
    color_no = control.Tag

    color_name = "black"

    If color_no = "0" Then color_name = "aqua"
    If color_no = "1" Then color_name = "black"
    If color_no = "2" Then color_name = "blue"
    If color_no = "3" Then color_name = "fuchsia"
    If color_no = "4" Then color_name = "lime"
    If color_no = "5" Then color_name = "red"
    If color_no = "6" Then color_name = "yellow"

    Call change_color_selected_item

    rbn_ui.InvalidateControl ("menu01")

End Sub


'選択色に対応する色を実際にShapeに設定する
Private Sub change_color_selected_item()

    Dim shp As Shape
    Dim ck1, ck2
    Dim chk_selected
    Dim trs_parency_val


    With ActiveWindow.Selection

        If .Type = ppSelectionNone Then Exit Sub                    '未選択
        If .Type = ppSelectionSlides Then Exit Sub                  'スライド選択
        'If .Type = ppSelectionShapes Then Stop                     'Shape選択
        'If .Type = ppSelectionText Then Stop                       '文字選択

        For Each shp In .ShapeRange

            chk_selected = 0
            ck1 = shp.Type
            ck2 = shp.AutoShapeType

            trs_parency_val = Val(Replace(trans_parency, "%", ""))
            If trs_parency_val > 0 Then trs_parency_val = trs_parency_val / 100

            If tgt_type = "shape" Then
                '図形(shape)に色をつける
                If ck1 <> msoAutoShape And ck1 <> msoCallout And ck1 <> msoTextBox Then chk_selected = 1
                If ck2 <= 0 Then chk_selected = 2

                If chk_selected = 0 Then

                    If color_name = "aqua" Then shp.Fill.ForeColor.RGB = RGB(0, 255, 255)
                    If color_name = "black" Then shp.Fill.ForeColor.RGB = RGB(0, 0, 0)
                    If color_name = "blue" Then shp.Fill.ForeColor.RGB = RGB(0, 0, 255)
                    If color_name = "fuchsia" Then shp.Fill.ForeColor.RGB = RGB(255, 0, 255)
                    If color_name = "lime" Then shp.Fill.ForeColor.RGB = RGB(0, 255, 0)
                    If color_name = "red" Then shp.Fill.ForeColor.RGB = RGB(255, 0, 0)
                    If color_name = "yellow" Then shp.Fill.ForeColor.RGB = RGB(255, 255, 0)

                    shp.Fill.Transparency = trs_parency_val

                End If


            ElseIf tgt_type = "line" Then
                '線に色をつける
                If color_name = "aqua" Then shp.Line.ForeColor.RGB = RGB(0, 255, 255)
                If color_name = "black" Then shp.Line.ForeColor.RGB = RGB(0, 0, 0)
                If color_name = "blue" Then shp.Line.ForeColor.RGB = RGB(0, 0, 255)
                If color_name = "fuchsia" Then shp.Line.ForeColor.RGB = RGB(255, 0, 255)
                If color_name = "lime" Then shp.Line.ForeColor.RGB = RGB(0, 255, 0)
                If color_name = "red" Then shp.Line.ForeColor.RGB = RGB(255, 0, 0)
                If color_name = "yellow" Then shp.Line.ForeColor.RGB = RGB(255, 255, 0)

                If ck1 <> msoInkComment Then
                    shp.Line.Transparency = trs_parency_val

                End If

            End If

        Next shp

    End With

End Sub


'◆◆◆◆◆ 塗り潰し透明度を設定する ◆◆◆◆◆
'透明度ラベル設定
Sub getLbl_transparency(control As IRibbonControl, ByRef lbl)

    lbl = trans_parency

End Sub

'透明度を設定する
Sub set_transparency(control As IRibbonControl)

    Dim select_tag_no
    select_tag_no = control.Tag

    trans_parency = "0%"

    If select_tag_no = "0" Then trans_parency = "0%"
    If select_tag_no = "20" Then trans_parency = "20%"
    If select_tag_no = "40" Then trans_parency = "40%"
    If select_tag_no = "60" Then trans_parency = "60%"
    If select_tag_no = "80" Then trans_parency = "80%"

    Call change_color_selected_item

    rbn_ui.InvalidateControl ("menu02")

End Sub


'◆◆◆◆◆ 線 もしくは、図形かを設定 ◆◆◆◆◆
'外部画像ファイルを取得設定する
Sub getImageTgt(control As IRibbonControl, ByRef img)
    Set img = LoadPicture(ActivePresentation.Path & "\color_sample\select_" & tgt_type & ".jpg")
    'Set img = LoadImage(ActivePresentation.Path & "\color_sample\png_" & color_name & ".png")
End Sub

'表示ラベル取得
Sub getLbl_selectTaget(control As IRibbonControl, ByRef lbl)

   lbl = tgt_type

End Sub

'shape・textBoxに選択色設定
Sub set_target_object_type(control As IRibbonControl)

    Dim shp_type
    shp_type = control.Tag

    tgt_type = "shape"

    If shp_type = "0" Then tgt_type = "line"
    If shp_type = "1" Then tgt_type = "shape"

    Call change_color_selected_item

    rbn_ui.InvalidateControl ("menu03")

End Sub
まとめ
気になったことを幾つか整理しておきます。
- editBox が大きく表示出来るとより良い。
- テキストボックス編集時、ホームタブに移動してしまう。
- メニューボタンのアイコン画像変更時に外部画像ファイルを読み込むが png ファイルは利用できない。 予めインポートした画像を利用できると良い・・・。
VBAプログラム全体です。
Option Explicit

Private rbn_ui As IRibbonUI     'リボン
Private edtTxt01 As String      'editBox文字列
Private edtTxt02 As String      'editBox文字列
Private edtTxt03 As String      'editBox文字列
Private edtTxt04 As String      'editBox文字列

Private color_name              'テキストボックス・shape塗り潰し色設定
Private trans_parency           'テキストボックス・shape透明度設定
Private tgt_type                'テキストボックス・shape透明度設定


'◆◆◆◆◆ 起動時初期設定 ◆◆◆◆◆
Sub onLoad(ribbon As IRibbonUI)

    color_name = "black"
    trans_parency = "0%"
    tgt_type = "shape"

    Set rbn_ui = ribbon

    edtTxt01 = "": edtTxt02 = "": edtTxt03 = "": edtTxt04 = ""

    rbn_ui.Invalidate                   'リボン表示更新

    Call add_shape_default_set          '追加SHAPEのデフォルト設定

End Sub

'◆◆◆◆◆ 検索デモ ◆◆◆◆◆
'コントロールテキスト取得
Sub getText(control As IRibbonControl, ByRef returnedVal) ' editBoxに文字列を代入する

    Dim rtn_tmp
    rtn_tmp = ""

    If control.Id = "editBox01" Then rtn_tmp = edtTxt01
    If control.Id = "editBox02" Then rtn_tmp = edtTxt02
    If control.Id = "editBox03" Then rtn_tmp = edtTxt03
    If control.Id = "editBox04" Then rtn_tmp = edtTxt04
    returnedVal = rtn_tmp

End Sub

'コントール変化時に値取得 (editBoxで[Enter]入力、他コントロール移動時イベント)
Sub onChange(control As IRibbonControl, text As String)

    If control.Id = "editBox01" Then edtTxt01 = text

End Sub


'検索処理想定
Sub onAction(control As IRibbonControl)

    Dim name_input

    name_input = StrConv(StrConv(Trim(edtTxt01), 1), 8)

    If name_input = "" Then
        MsgBox "氏名が未入力です。処理を中断します。", vbOKOnly + vbExclamation, "氏名未設定エラー"
        edtTxt02 = "": edtTxt03 = "": edtTxt04 = ""

    ElseIf Left(name_input, 2) = "鈴木" Then
        MsgBox "鈴木さんの電話番号を確認しました。", vbOKOnly + vbInformation, "電話番号確認!"
        edtTxt02 = "012": edtTxt03 = "345": edtTxt04 = "6789"

    ElseIf Left(name_input, 2) = "田中" Then
        MsgBox "田中さんの電話番号を確認しました。", vbOKOnly + vbInformation, "電話番号確認!"
        edtTxt02 = "9999": edtTxt03 = "8765": edtTxt04 = "4321"

    Else
        MsgBox "知らない人です。処理を中断します。", vbOKOnly + vbExclamation, "知らない人です。"
        edtTxt02 = "": edtTxt03 = "": edtTxt04 = ""

    End If

    rbn_ui.InvalidateControl ("editBox02")
    rbn_ui.InvalidateControl ("editBox03")
    rbn_ui.InvalidateControl ("editBox04")

End Sub


'◆◆◆◆◆ 塗り潰し色を設定する ◆◆◆◆◆
'外部画像ファイルを取得設定する
Sub getImage(control As IRibbonControl, ByRef img)
    Set img = LoadPicture(ActivePresentation.Path & "\color_sample\j_" & color_name & ".jpg")
    'Set img = LoadImage(ActivePresentation.Path & "\color_sample\png_" & color_name & ".png")
End Sub

'表示ラベル取得
Sub getLabel(control As IRibbonControl, ByRef lbl)

   lbl = color_name

End Sub

'shape・textBoxに選択色設定
Sub get_color(control As IRibbonControl)

    Dim color_no
    color_no = control.Tag

    color_name = "black"

    If color_no = "0" Then color_name = "aqua"
    If color_no = "1" Then color_name = "black"
    If color_no = "2" Then color_name = "blue"
    If color_no = "3" Then color_name = "fuchsia"
    If color_no = "4" Then color_name = "lime"
    If color_no = "5" Then color_name = "red"
    If color_no = "6" Then color_name = "yellow"

    Call change_color_selected_item

    rbn_ui.InvalidateControl ("menu01")

End Sub


'選択色に対応する色を実際にShapeに設定する
Private Sub change_color_selected_item()

    Dim shp As Shape
    Dim ck1, ck2
    Dim chk_selected
    Dim trs_parency_val


    With ActiveWindow.Selection

        If .Type = ppSelectionNone Then Exit Sub                    '未選択
        If .Type = ppSelectionSlides Then Exit Sub                  'スライド選択
        'If .Type = ppSelectionShapes Then Stop                     'Shape選択
        'If .Type = ppSelectionText Then Stop                       '文字選択

        For Each shp In .ShapeRange

            chk_selected = 0
            ck1 = shp.Type
            ck2 = shp.AutoShapeType

            trs_parency_val = Val(Replace(trans_parency, "%", ""))
            If trs_parency_val > 0 Then trs_parency_val = trs_parency_val / 100

            If tgt_type = "shape" Then
                '図形(shape)に色をつける
                If ck1 <> msoAutoShape And ck1 <> msoCallout And ck1 <> msoTextBox Then chk_selected = 1
                If ck2 <= 0 Then chk_selected = 2

                If chk_selected = 0 Then

                    If color_name = "aqua" Then shp.Fill.ForeColor.RGB = RGB(0, 255, 255)
                    If color_name = "black" Then shp.Fill.ForeColor.RGB = RGB(0, 0, 0)
                    If color_name = "blue" Then shp.Fill.ForeColor.RGB = RGB(0, 0, 255)
                    If color_name = "fuchsia" Then shp.Fill.ForeColor.RGB = RGB(255, 0, 255)
                    If color_name = "lime" Then shp.Fill.ForeColor.RGB = RGB(0, 255, 0)
                    If color_name = "red" Then shp.Fill.ForeColor.RGB = RGB(255, 0, 0)
                    If color_name = "yellow" Then shp.Fill.ForeColor.RGB = RGB(255, 255, 0)

                    shp.Fill.Transparency = trs_parency_val

                End If


            ElseIf tgt_type = "line" Then
                '線に色をつける
                If color_name = "aqua" Then shp.Line.ForeColor.RGB = RGB(0, 255, 255)
                If color_name = "black" Then shp.Line.ForeColor.RGB = RGB(0, 0, 0)
                If color_name = "blue" Then shp.Line.ForeColor.RGB = RGB(0, 0, 255)
                If color_name = "fuchsia" Then shp.Line.ForeColor.RGB = RGB(255, 0, 255)
                If color_name = "lime" Then shp.Line.ForeColor.RGB = RGB(0, 255, 0)
                If color_name = "red" Then shp.Line.ForeColor.RGB = RGB(255, 0, 0)
                If color_name = "yellow" Then shp.Line.ForeColor.RGB = RGB(255, 255, 0)

                If ck1 <> msoInkComment Then
                    shp.Line.Transparency = trs_parency_val

                End If

            End If

        Next shp

    End With

End Sub


'◆◆◆◆◆ 塗り潰し透明度を設定する ◆◆◆◆◆
'透明度ラベル設定
Sub getLbl_transparency(control As IRibbonControl, ByRef lbl)

    lbl = trans_parency

End Sub

'透明度を設定する
Sub set_transparency(control As IRibbonControl)

    Dim select_tag_no
    select_tag_no = control.Tag

    trans_parency = "0%"

    If select_tag_no = "0" Then trans_parency = "0%"
    If select_tag_no = "20" Then trans_parency = "20%"
    If select_tag_no = "40" Then trans_parency = "40%"
    If select_tag_no = "60" Then trans_parency = "60%"
    If select_tag_no = "80" Then trans_parency = "80%"

    Call change_color_selected_item

    rbn_ui.InvalidateControl ("menu02")

End Sub


'◆◆◆◆◆ 線 もしくは、図形かを設定 ◆◆◆◆◆
'外部画像ファイルを取得設定する
Sub getImageTgt(control As IRibbonControl, ByRef img)
    Set img = LoadPicture(ActivePresentation.Path & "\color_sample\select_" & tgt_type & ".jpg")
    'Set img = LoadImage(ActivePresentation.Path & "\color_sample\png_" & color_name & ".png")
End Sub

'表示ラベル取得
Sub getLbl_selectTaget(control As IRibbonControl, ByRef lbl)

   lbl = tgt_type

End Sub

'shape・textBoxに選択色設定
Sub set_target_object_type(control As IRibbonControl)

    Dim shp_type
    shp_type = control.Tag

    tgt_type = "shape"

    If shp_type = "0" Then tgt_type = "line"
    If shp_type = "1" Then tgt_type = "shape"

    Call change_color_selected_item

    rbn_ui.InvalidateControl ("menu03")

End Sub


'SHAPE等の初期設定する
Public Sub add_shape_default_set()

    Dim act_prs As Presentation
    Dim sld As Slide
    Dim txt As Shape

    Set act_prs = ActivePresentation
    Set sld = act_prs.Slides.Add(Index:=1, Layout:=ppLayoutText)
    Set txt = sld.Shapes.AddTextbox(Orientation:=msoTextOrientationHorizontal, Left:=50, Top:=50, Width:=120, Height:=40)

    txt.Name = "AddedTextBox"
    txt.TextFrame.TextRange = "サンプル"
    txt.TextFrame.TextRange.ParagraphFormat.Alignment = ppAlignCenter
    txt.TextFrame.VerticalAnchor = msoAnchorMiddle

    txt.TextFrame.MarginLeft = 0
    txt.TextFrame.MarginRight = 0
    txt.TextFrame.MarginTop = 0
    txt.TextFrame.MarginBottom = 0
    txt.TextFrame.AutoSize = ppAutoSizeNone

    txt.TextEffect.FontSize = 20
    txt.TextEffect.FontBold = msoTrue
    txt.TextFrame.TextRange.Font.Name = "MS Pゴシック"
    txt.TextFrame.TextRange.Font.NameComplexScript = "MS Pゴシック"
    txt.TextFrame.TextRange.Font.NameFarEast = "MS Pゴシック"
    txt.TextFrame.TextRange.Font.Color.RGB = RGB(255, 0, 0)                 '文字色

    txt.Fill.Visible = msoTrue
    txt.Fill.ForeColor.RGB = RGB(255, 255, 220)                             'ボックス内部色(薄黄色)

    txt.Line.Visible = msoTrue
    txt.Line.Weight = 2
    txt.Line.ForeColor.RGB = RGB(0, 0, 255)                                 '枠線色(青)

    txt.SetShapesDefaultProperties                                          'デフォルトプロパティに設定


    Set txt = sld.Shapes.AddLine(BeginX:=100, BeginY:=100, EndX:=200, EndY:=200)
    txt.Line.ForeColor.RGB = RGB(255, 0, 0)                                 '直線色
    txt.Line.Weight = 3
    txt.SetShapesDefaultProperties                                          'デフォルトプロパティに設定

    Set txt = sld.Shapes.AddShape(Type:=msoShapeRectangle, Top:=70, Left:=200, Width:=100, Height:=120)
    txt.Fill.ForeColor.RGB = RGB(255, 255, 220)                             'ボックス内部色(薄黄色)
    txt.Line.Weight = 2
    txt.Line.ForeColor.RGB = RGB(0, 0, 255)                                 '枠線色(青)

    txt.TextFrame.TextRange = "サンプル"
    txt.TextFrame.TextRange.ParagraphFormat.Alignment = ppAlignCenter
    txt.TextFrame.VerticalAnchor = msoAnchorMiddle

    txt.TextFrame.MarginLeft = 0
    txt.TextFrame.MarginRight = 0
    txt.TextFrame.MarginTop = 0
    txt.TextFrame.MarginBottom = 0
    txt.TextFrame.AutoSize = ppAutoSizeNone

    txt.TextEffect.FontSize = 20
    txt.TextEffect.FontBold = msoTrue
    txt.TextFrame.TextRange.Font.Name = "MS Pゴシック"
    txt.TextFrame.TextRange.Font.NameComplexScript = "MS Pゴシック"
    txt.TextFrame.TextRange.Font.NameFarEast = "MS Pゴシック"
    txt.TextFrame.TextRange.Font.Color.RGB = RGB(255, 0, 0)                 '文字色

    txt.SetShapesDefaultProperties                                          'デフォルトプロパティに設定

    sld.Select

    sld.Delete


End Sub